Pages

Sunday, October 25, 2026

Cats & Bats, Witches & Brooms: Chocolate Halloween Cookies

A few years ago, I found these Vintage 1960s Halloween Cookie (Cooky) Cutters at the Alameda Flea Market. I love the retro box and the shapes. These are perfect for Chocolate Halloween Cookies!

I've posted some great chocolate cookie recipes, but here's one more. This one is adapted from a Martha Stewart recipe. Just a few changes, and since Martha uses this recipe with her own bat and cat cookie cutters, these cookies are great to make with these Retro Cookie Cutters. These chocolate cookies are very crisp. I think using dark cocoa gives them an even richer taste, too.

Chocolate Cats & Bats, Witches & Brooms: 
Halloween Cookies

Makes 40 to 50

Ingredients
1 1/2 cups all-purpose flour, (spooned and leveled) plus more for rolling and cutting out dough
3/4 cup unsweetened DARK cocoa powder
1/2 teaspoon salt
12 tablespoons unsalted butter, room temperature
1 cup sugar
1 large egg
Small candies or sprinkles, for decorating (optional)

Directions
Preheat oven to 350 degrees. In medium bowl, whisk together flour, cocoa, and salt; set aside.

In large bowl, with electric mixer, beat butter and sugar until light and fluffy; beat in egg. On low speed, mix in flour mixture. Divide dough in half, and form into 2 disks, each about 3/4 inch thick. Wrap disks in plastic; chill until firm, at least 45 minutes and up to 2 days.

On lightly floured sheet of waxed paper, using a floured rolling pin, roll dough 1/4 inch thick. (If dough becomes too soft to work with, refrigerate for a few minutes.)

Using 2- to 3-inch Halloween cookie cutters, cut out shapes, dipping cutters in flour as necessary to prevent sticking; place on baking sheet, spacing 1 inch apart.

Bake until surface is dry to the touch, 10 to 15 minutes (if decorating, press candies into dough halfway through baking-as in eyes on the cats, etc). 

Cool cookies 1 to 2 minutes on baking sheet; transfer to rack to cool completely.

Friday, October 23, 2026

Boston Cream Pie Poke Cake: Boston Cream Pie Day

Today is National Boston Cream Pie Day. Boston Cream Pie, isn't exactly a pie, and it's not exactly a cake. A Boston Cream Pie is a round cake that is split and filled with a custard or cream filling and frosted with chocolate. Not exactly your standard pie, but it's been around since 1855 or 1856 (two different sources with different dates).

According to Wikipedia, Boston Cream Pies were created by French Chef M. Sanzian at Boston's Parker House Hotel, opened in 1855. This pudding/cake combination comprises two layers of sponge cake filled with vanilla custard or crème pâtissière. The cake is topped with a chocolate glaze (such as ganache) and sometimes confectioner's sugar or a cherry. The cherry and sugar topping is rarely used any more.

The real question is why this is called a pie? It's a cake, after all -- two layers of yellow cake filled with custard and topped with chocolate frosting. Suggestions on why it's called pie are welcome. And here's an interesting fact: The Boston Cream Pie is the official dessert of the Commonwealth of Massachusetts. 

I've posted traditional recipes for Boston Cream Pie--from scratch and from mixes--and I've posted Boston Cream Pie Cheesecake (a favorite!). So for today's holiday I thought I'd post a really easy recipe for Boston Cream Pie Poke Cake. What's a Poke Cake, you ask? A poke cake is usually made with a boxed cake mix and a pudding mix. You poke holes in the cake after it's been baked, but still warm, and you pour the pudding over it. How easy is that? And Boston Cream Pie lends itself to this easy cake. Very Retro!

Boston Cream Pie Poke Cake

Ingredients
1 (18 ounce) box yellow cake mix
2 (5.1-oz) packs of instant French vanilla pudding
4 cups cold milk
2 cups dark chocolate, chopped
1 cup heavy cream

Directions
Preheat oven to 350 degrees F. Butter 9-x-13” pan and sprinkle with flour.
Prepare cake mix according to box instructions. Pour into prepared baking dish and bake until toothpick inserted in middle of cake comes out clean, about 25 minutes. Cool cake.
When cake is cool-ish, poke big holes across entire surface of cake using rounded end of wooden spoon.
Combine pudding mix and milk in medium bowl and whisk until mixture just begins to thicken. Pour over cake and spread with spatula to make sure pudding pours into holes. Cover and refrigerate for 2 hours.
After cake has been refrigerated for 2 hours, make ganache. Put chopped chocolate in medium glass bowl and set aside. Meanwhile, bring heavy cream to simmer in small saucepan. When bubbles start to break surface, pour hot cream over chopped chocolate and whisk until mixture is smooth. Pour ganache over the pudding layer of the cake and serve.

Thursday, October 22, 2026

DIAMOND WALNUT CLUSTERS: Retro Ad with Recipe for National Nut Day

Today is National Nut Day! Add chocolate! You know I love retro ads, and this 1950 Retro Ad & Recipe from Diamond Walnuts sure fits the bill. Love the graphics--and the recipes. I would substitute good quality very dark chocolate instead of unsweetened chocolate (you might cut down a bit on the sugar) and butter instead of margarine, but it's up to you! Celebrate National Nut Day. Sometimes you feel like a Nut!


Wednesday, October 21, 2026

CHOCOLATE CHIP PUMPKIN CHEESECAKE: Pumpkin Cheesecake Day

Today is National Pumpkin Cheesecake Day: Add Chocolate. I love pumpkin and chocolate... and cheesecake is my thing, so here's a repost of an easy recipe for Pumpkin Chocolate Cheesecake! Celebrate.  

Great for Pumpkin Cheesecake Day, Halloween, and Thanksgiving!

The filling for this pumpkin cheesecake is adapted from a recipe from Hershey's Kitchens. I like this recipe because it has a Chocolate Cookie Crust and Mini-Chocolate Chips in the filling! I've posted the Hershey's chocolate crust recipe, but I also posted another simple Chocolate Cookie Crust using Chocolate Wafers. The second is my favorite.

CHOCOLATE CHIP PUMPKIN CHEESECAKE BAKED IN A CHOCOLATE COOKIE CRUST

Ingredients

1 Chocolate Cookie Crust (see two possible recipes below)
3 packages (8 ounces each) cream cheese, softened
1 cup sugar
3 tablespoons all-purpose flour
1 teaspoon pumpkin pie spice
1 cup canned pumpkin (without spice)
4 eggs
1-1/2 cups Mini Semi-Sweet Chocolate Chips

Directions

Prepare Chocolate Cookie Crust. Bake at 400°F. Cool.
Beat cream cheese, sugar, flour, and pumpkin pie spice in large bowl until well blended. Add pumpkin and eggs; beat until well blended. Stir in mini-chocolate chips; pour batter into prepared crust. Bake 10 minutes.
Reduce oven temperature to 250°F; continue baking 60 minutes or until almost set. Remove from oven to wire rack. With knife, loosen cake from side of pan.
Cool completely; remove side of pan. Refrigerate about 5 hours before serving.

I. CHOCOLATE COOKIE CRUST

Stir together 1 cup vanilla wafer crumbs (about 30 wafers)
1/4 cup HERSHEY'S Cocoa
1/4 cup powdered sugar
1/4 cup melted butter.

Press mixture firmly onto bottom and 1/2-inch up side of 9-inch springform pan.
Bake  at 350 F for 8 minutes; cool slightly.

II. CHOCOLATE COOKIE CRUST

30 chocolate wafers (makes about 1 1/2 cups crumbs)
5 Tbsp unsalted butter, melted and slightly cooled
1/8 tsp salt
1/2 tsp pure vanilla extract

Put cookies in container of food processor; process until finely ground.
Transfer crumbs to mixing bowl; combine crumbs, butter, salt, and vanilla; stir until crumbs are moistened.
Press mixture evenly across the bottom of 9-inch springform pan and all the way up sides of pan; pack tightly so crust is even and compacted.
Bake at 350° for 6-8 minutes or until crisp.
Let cool completely before filling.

Tuesday, October 20, 2026

WHITE CHOCOLATE GHOST POPS: Halloween

Here's a really easy recipe from Martha Stewart for White Chocolate Ghost Pops! It's the perfect treat and activity for Halloween. The kids will love it, and the Pops are delicious!

WHITE CHOCOLATE GHOST POPS
Makes about 15

Ingredients
12 ounces white chocolate--chopped or white chocolate disks (I use Ghirardelli or Guittard -- be sure to use 'real' white chocolate!)
1 1/2 Tbsp vegetable oil
Lollipop sticks
Mini chocolate chips

Directions
Line baking sheet with waxed paper; set aside.
Melt white chocolate in heat-proof bowl over simmering water; stir occasionally.
Remove bowl; mix in oil.
Drop 1 tablespoon of mixture onto prepared baking sheet.
Use back of teaspoon to quickly spread into ghost.
Place lollipop stick at base, spinning to coat.
Add chocolate chip eyes.
Refrigerate ghosts 5 minutes, then peel off waxed paper.

Monday, October 19, 2026

CHOCOLATE MICE: Halloween!

This is one of my favorite Halloween recipes. I found it a few years ago on allrecipes.com. I've tweaked it a little, and, as always, feel free to do the same. These Chocolate Mice are fabulous! They look adorable and taste delicious. Warning: They can be pretty sweet, but then it's Halloween! That's why I substituted dark chocolate for milk chocolate in the recipe, but if you prefer milk chocolate, by all means use it. 

Hint: You can use this recipe to make White Chocolate Mice for Christmas!

CHOCOLATE MICE

Ingredients
4 ounces dark chocolate  (or milk chocolate, if you prefer)
1/3 cup sour cream
1 cup chocolate cookie crumbs (whirl chocolate wafers in a blender)
2/3 cup chocolate cookie crumbs
24 silver dragees decorating candy (those tiny silver candy balls) or icing gel or pearl candies
1/4 cup sliced almonds (try to match pairs)
12 (2 inch) pieces long thin red vine string licorice

Directions
Melt chocolate, and combine with sour cream. Stir in 1 cup chocolate cookie crumbs. Cover and refrigerate until firm.
Roll by level tablespoonfuls into balls. Mold to slight point at one end (the nose).
Roll dough in chocolate cookie crumbs. On each mouse, place dragees (or other decorating candy or icing) in appropriate spot for eyes (on the sides/not directly at front), almond slices for ears, and a red licorice string for the tail.
Refrigerate for at least two hours, until firm.

Place on a bed of graham cracker crumbs or vanilla wafer crumbs or Rice Crispies.


Sunday, October 18, 2026

TRIPLE CHOCOLATE CUPCAKES: National Chocolate Cupcake Day!

Today is Chocolate Cupcake Day. To celebrate, here's a recipe for Triple Chocolate Cupcakes. Cupcake, Icing, and Ganache Center. 

I fill my cupcakes with chocolate ganache. If you find your ganache is too thick, just thin it out with a bit of cream. I also use the ganache for the icing. Saves a step.

TRIPLE CHOCOLATE CUPCAKES

Cupcakes

Ingredients
1/2 cup unsalted butter, room temperature
1-1/4 cups sugar
2 large eggs, room temperature
3/4 cup flour
1/2 tsp baking powder
1/4 tsp baking soda
1/4 tsp Kosher Salt
3/4 cup Dark cocoa powder  (Read about Natural vs. Dutch Process cocoa)
1/2 cup whole milk
1 tsp pure vanilla
2/3 cup mini dark chocolate chips

Directions
Beat butter and sugar until light and fluffy.
Add eggs, one at a time, beating until well combined.
In small bowl, place flour, baking powder, baking soda, salt, and cocoa powder and combine.
Add milk and vanilla and stir.
Add 1/3 dry ingredients to butter/sugar mixture and beat to combine.
Add half milk/vanilla mixture and beat to combine.
Continue adding, alternating between dry and wet and finishing with dry ingredients.
Fold in chocolate chips.
Scoop batter into cupcake cups between 1/2 & 3/4 full.
Bake at 350 degrees for 20-25 minutes or until toothpick comes out clean.

To make cupcakes flat on top: Bake in paper cups and flip onto flat surface when finished baking.  Leave pan sitting on top to make them flat. Allow to cool.
Freeze cupcakes and then use an apple corer to make the hole for the filling.

Ganache

Ingredients
12 ounces good quality chocolate, chopped
2 cups heavy whipping cream
2 Tbsp unsalted butter


Directions
Place chocolate in medium sized bowl. 
Heat cream over medium low heat until barely begins to boil. Remove from heat immediately. Do not over-heat! 
Pour hot cream over chocolate and let sit for minute. 
Stir mixture (gently) until chocolate is melted and blended with cream. 
Add butter and combine. 
Do not beat the mixture.
Cool before filling or spreading. (use pastry bag to fill and frost) 

Sprinkle with jimmies, chocolate curls, silver balls, or other decorations.

Saturday, October 17, 2026

CHOCOLATE PASTA RECIPES: National Pasta Day

Today is National Pasta Day. I used to make my own pasta, but not so much anymore. It's so easy to find fresh pasta at shops in my neighborhood. However, since it is National Pasta Day, I thought I'd post a few recipes for Chocolate Pasta.
 

Chocolate Pasta

Ingredients
1 3/4 cup Flour
1/4 cup Cocoa powder
2 Egg
4 Tbsp Water

Directions
Mix flour and cocoa well. Mound on work surface or in large bowl. Make deep well in center of mound and break the eggs into it. Beat eggs in with fork, adding about 2 Tbsp water. Using circular motion, draw flour and cocoa into center. Toss in another Tbsp of Water. Stir with fork until all flour is moistened. Add more water as needed. Finish mixing by hand. Pat dough into ball. Clean off work surface, and flour it. Knead dough for about 10 minutes, or until dough becomes silky and elastic. Cover dough and let rest for half hour. Roll out 1/4 of dough at time. A machine makes this easy. Allow pasta to dry a little before cooking. Makes 4 to 5 cups of cooked pasta---plenty for dessert.

You can always buy some great dark chocolate pasta. There are many brands. My market sells fresh chocolate pasta!

Here are two recipes from Pappardelle (Dark Chocolate Pasta)

Dark Chocolate Pasta with Chocolate Sauce

Ingredients
1 pound Pappardelle’s Dark Chocolate Pasta
1 cup semi-sweet chocolate chips (or chopped dark chocolate)
1/2 cup unsalted butter
2 cups powdered sugar, sifted
1 1/2 cups evaporated milk
1 teaspoon vanilla

Directions
Cook pasta in pot of rapidly boiling salted water until al dente (about 8-10 minutes). Drain and rinse with cool water.
Melt chocolate chips and butter together in small saucepan. Add powdered sugar and milk. Stir constantly and bring to boil. Reduce heat to low simmer. Cook for 8 minutes, continuing to stir constantly. Add vanilla.
In serving dishes, add pasta, top with chocolate sauce. Garnish with favorite topping.

Chocolate Noodle Kugel

Ingredients
1 pound Pappardelle’s Dark Chocolate Noodles (these really are quite good)
1 stick butter, cut into pieces
1 cup whole milk
5 large eggs, lightly beaten
1/2 cup sugar
2 tsp vanilla
1 tsp salt
1 pound container of sour cream
1 pound container of small curd cottage cheese

Topping:
2 cups cornflakes, coarsely crushed
2 Tbsp sugar
2 tsp cinnamon
2 Tbsp butter, cut into pieces

Directions
Preheat oven to 350 degrees. Butter a 13 x 9 inch baking dish (lasagna style pan).
Meanwhile, cook pasta in 6-8 quarts of rapidly boiling salted water until al dente (about 8-10 minutes). Drain, then return to cooking pot and add butter. Toss until noodles are well coated and butter is completely melted.
Whisk together milk, eggs, sugar, vanilla, and salt until combined, then whisk in sour cream. Stir in cottage cheese and add to noodles. Spoon gently into baking dish.
For topping, stir together cornflakes, sugar, and cinnamon and sprinkle over noodles. Dot with butter and bake kugel until edges are golden brown, about 40-50 minutes. Let stand before serving.

Have some chocolate pasta recipes? Love to see them.

Friday, October 16, 2026

Cinnamon Swirl Chocolate Raisin Bread

I love bread..probably more than cake. I used to make all my own bread, but in the past 20+ years my home town of Berkeley, California, has been the epicenter of food, and, for me, bread! So to celebrate National Bread Day, I thought I'd post a recipe for Cinnamon Swirl Chocolate Raisin Bread!

My favorite recipe is from Zabar's website! No surprise there! Recipe by Tiffany Ludwig with a few adaptations. As always, use the very best chocolate and cinnamon.

Cinnamon Swirl Chocolate Raisin Bread

Ingredients 
1 cup warm milk
4 Tbsp brown sugar
1 packet instant yeast (2 1/4 tsp) 
6 Tbsp unsalted butter, melted and cooled
2 eggs
3 1/2 cups white all-purpose flour
1 tsp salt
1/2 cup raisins
1/3 cup brown sugar
2 Tbsp cinnamon
3 Tbsp unsalted butter, melted
1/4 cup dark chocolate chips

Directions
Combine warm milk, 4 Tbsp brown sugar, and yeast, stir and wait 10 minutes.
In bowl of stand mixer whisk yeast mixture, eggs, and melted butter. Add flour and salt all at once and with dough hook attachment combine on low speed. To this loose dough add raisins and continue to knead on medium /low for 10 minutes. Don't worry if raisins drop out of the dough, they will eventually combine with the dough. If dough nudges up over the hook pause machine, push dough back down. If dough is very dry, add water; if too sticky, add flour, but only a bit.
You can also mix and knead by hand for 10 minutes. 
Remove hook and let dough rest in bowl, covered in plastic wrap, for at least an hour. It will double in size.

Filling Ingredients
In small bowl, combine brown sugar, cinnamon, and melted butter to make paste.
Prepare 5"x 9" loaf pan with butter and line bottom and sides with parchment paper.
Flour counter top and stretch dough to form rectangle approximately 8"x18".
Spread filling over entire dough and sprinkle on chocolate chips.
From short end, roll up dough tightly all the way across.
Place dough in prepared loaf pan, seam side down.
Cover with plastic wrap and let rise for 45 min.
Preheat oven to 375 degrees.
Bake 45-50 minutes, until internal temperature reads 190 degrees.
Remove from oven, loosen ends with knife and lifting the parchment (if used) remove bread from pan.
Allow to fully cool on a rack before slicing.

Thursday, October 15, 2026

LUCY & ETHEL IN THE CANDY FACTORY: I Love Lucy Day

Today is I Love Lucy Day. And really, who doesn't love Lucy? I Love Lucy was one of the most watched television series of its time. Today's unofficial holiday commemorates the day in 1951, when the show, starring real-life couple at that time, Lucille Ball and Desi Arnaz, debuted on CBS.

Being that I'm all about chocolate, here's my favorite scene from the Queen of Comedy: Lucy and Ethel in the Candy Factory.

And, in case you're curious about where this episode was filmed: Filming actually took place at the See's Candies factory in Los Angeles, on May 30, 1952.  Lucille Ball and Vivian Vance spent half a day learning the ropes, dipping chocolates and packing candy on the production line before filming began. The uniforms the two wore were actually borrowed from See's workers.

Watch the Lucy & Ethel in the Candy Factory clip below. 

And, in case you want collectible to commemorate the episode,  you can find Lucy & Ethel in the Candy factory Barbie dolls on eBay. 


Wednesday, October 14, 2026

Cartoon of the Day: Dessert Day


DESSERT CHARCUTERIE BOARD: National Dessert Day

Today is National Dessert Day, but every day is Dessert day at my house-- chocolate dessert. But if you’re looking for a few fun ideas to put together for National Dessert Day or for a sweet surprise for your next party, check out this guide from Shari’s Berries on Dessert Charcuterie Boards. One of the best ways to  introduce your guests to  your favorite treats is with a dessert charcuterie board! Whether you prefer a traditional mix of flavors or bits based on a certain theme, build your board with a variety of sweets. Opt for candy such as chocolates or go big with brownie bites and cupcakes.

Shari's Berries:

Before you create your dessert charcuterie board, you need to choose a theme! Your favorite flavor combinations or a certain ingredient like a specific candy or fruit can help inspire your board’s theme. Once you’ve chosen a theme, consider what ingredients will add visual interest and texture to your dessert platter. If you’re not sure what to include, these dessert charcuterie board recipes will give you a place to start!

Fruit Lover 
Enjoy fresh fruit paired with creamy melted chocolate for a sweet surprise! An assortment of dried fruits and berry kabobs are perfect to dip into a melted mound of chocolate. A side of brie and fruit crackers are perfect for pairing with tangy and bold fruit flavors. Add in a handful of hand-dipped cherries to top off this candied board.

Sweet and Salty 
Satisfy both of your cravings at the same time with this dessert charcuterie board. Compile savory snacks like crunchy bacon and salted nuts to pair with a mixed hazelnut and chocolate spread. Dark chocolate with sea salt and chocolate potato chips are also great options to wake up your tastebuds!

Charcuterie Board Styling Tips 
Using the right size boards and utensils will make assembling and serving that much easier! Before you begin, choose the right size board to display your treats on. Place the necessary bowls and utensils on before adding food to assess how much space is left over and then add in your other ingredients around this. If space allows, place extra ingredients such as sauces and dips on the outside of the board. Last but not least, make sure to add in some color! A mix of bright shades will attract the eyes of your guests, but it will be the fun flavor combinations that keep them coming back!

Experiment! Enjoy!

Tuesday, October 13, 2026

Red's Ultimate M&M Cookies: National M&M Day

Today is National M&M Day! Celebrate with Red's Ultimate M&M Cookies or just eat a handful of M&Ms. 

M&Ms originated in the United States in 1941, and are now sold in as many as 100 countries. The candy-coated chocolate concept was inspired by a method used to allow soldiers to carry chocolate without having it melt. They are produced in different colors, some of which have changed over the years, with special ones for holidays and celebrations. 

Red's Ultimate M&M Cookies

Ingredients
1 cup unsalted butter, softened
1/2 cup granulated sugar
1/2 cup firmly packed light brown sugar
1 large egg
1 tsp pure vanilla extract
2 cups all-purpose flour
1/2 tsp baking soda
1/8 tsp salt
1 12-ounce package M&M® MINIS®

Directions
Preheat oven to 350°F.
In large bowl, cream butter and sugars until light and fluffy
Beat in egg and vanilla.
In medium bowl combine flour, baking soda, and salt; blend into butter/sugar mixture.
Stir in M&M® MINIS® Milk Chocolate Candies.
Drop dough by heaping teaspoonfuls 2 inches apart onto ungreased cookie sheets.
Bake 10 to 13 minutes or until edges are lightly browned and centers are still soft. Do not overbake. Cool 1 minute on cookie sheets; cool completely on wire racks.
Store in tightly covered container.

MAKES ABOUT 50 COOKIES.

Monday, October 12, 2026

CHRISTOPHER COLUMBUS & CHOCOLATE: Recipe for Super Rich Spanish Hot Chocolate

Today is Columbus Day (as well as Indigenous People Day). In terms of chocolate, Christopher Columbus was the first European to come in contact with cacao. On August 15, 1502, on his fourth and last voyage to the Americas, Columbus and his crew encountered a large dugout canoe near an island off the coast of what is now Honduras. The canoe was the largest native vessel the Spaniards had seen. It was "as long as a galley," and was filled with local goods for trade -- including cacao beans. Columbus's crew seized the vessel and its goods, and retained its captain as his guide.

Later, Columbus' son Ferdinand wrote about the encounter. He was struck by how much value the Native Americans placed on cacao beans, saying: "They seemed to hold these almonds [referring to the cacao beans] at a great price; for when they were brought on board ship together with their goods, I observed that when any of these almonds fell, they all stooped to pick them up, as if an eye had fallen."

At first, however, the cocoa beans were neglected. Despite the bitterness of the drink produced, Columbus claimed the resulting concoction was a "divine drink which builds up resistance and fights fatigue. A cup of this precious drink permits a man to walk for a whole day without food". 

What Ferdinand and the other members of Columbus' crew didn't know at the time was that cocoa beans were the local currency. In fact, in some parts of Central America, cacao beans were used as currency as recently as the last century.

While it is likely that Columbus brought the cacao beans he seized back to Europe, their potential value was initially overlooked by the Spanish King and his court. Far more exciting treasures on board his galleons meant the cocoa beans were ignored. It was his fellow explorer, the Spanish Conquistador Don Hernán Cortés, who first realized their commercial value. He brought back three chests full of cocoa beans to Spain in 1528 and very gradually, the custom of drinking the chocolate spread across Europe.

It was still served as a beverage when the Spanish first brought chocolate back to Europe. Cortez, described chocolatl as "the divine drink ... which builds up resistance and fights fatigue," and his countrymen, conceived the idea of sweetening the bitter drink with cane sugar.

The recipe for the sweetened frothy beverage underwent several more changes in Spain, where newly discovered spices such as cinnamon and vanilla were added as flavorings. The original chili pepper that made the spicy drink was replaced by sugar to make a sweet beverage. The sweetened chocolate beverage was a luxury that only a few could afford.

By the 17th century, the drink became common among European nobility. In London, chocolate was more widely available, and those who could afford it could enjoy the drink in coffee and chocolate houses.

Super Rich Spanish Hot Chocolate 
Makes two mugs!

Ingredients 
5 Tbsp good quality unsweetened DARK cocoa powder
4 Tbsp sugar
1/2 Tbsp corn starch
1 tsp Mexican vanilla extract
1 cup water

Directions 
Combine cocoa powder, sugar, and corn starch in small bowl.
Pour COLD water into small sauce pan, add vanilla extract and cocoa mixture, and cook at medium low heat, stirring constantly.
Cook until it thickens and serve immediately.

Saturday, October 10, 2026

CHOCOLATE TRUFFLE COOKIES WITH SEA SALT


I love cookies! Here's an easy recipe for Chocolate Truffle Cookies with Sea Salt from local San Francisco chocolate company Ghirardelli. Ghirardelli has some great recipes online and in their Cookbooks.


In 1849, during the California Gold Rush, Italian-born Domingo Ghirardelli moved to America and opened a store in a mining camp. After discovering the miners were starved for luxuries and needed something to spend their gold dust on, he starting stocking chocolate delicacies. In 1852, the enterprising immigrant founded a confectionery shop in San Francisco, which eventually became the modern-day Ghirardelli Chocolate Company.

Today, Ghirardelli is America’s oldest continuously operating chocolate maker. Their products are sold in stores everywhere and online, and they also have their own chocolate and ice cream shops across the country.


CHOCOLATE TRUFFLE COOKIES WITH SEA SALT

Ingredients
1/4 cup all purpose flour
1/4 teaspoon baking powder
1/4 teaspoon salt
1-1/2 cups Ghirardelli 60% Cacao Bittersweet Baking Chips, for melting into the cookie dough
2 tablespoon unsalted butter
2 eggs
1/2 cup granulated sugar
1 teaspoon pure vanilla extract
1/3 cup Ghirardelli 60% Cacao Bittersweet Baking Chips, for mixing into the prepared cookie dough
2 to 3 tablespoons coarse sea salt

Directions
In heatproof bowl over double boiler, melt chocolate and butter until smooth. Turn off stove and let chocolate sit over warm water.
Combine flour, baking powder, and salt and mix to combine.
In another bowl, mix together sugar and eggs, combine thoroughly with whisk and slowly add warm chocolate mixture. Stir to combine. Add vanilla extract and mix. Stir in flour mixture.
Cool for a few minutes (if batter is warm, chocolate chips will melt). Stir in chocolate chips. Chill for 10-15 minutes.
Preheat oven to 350°F.
Scoop rounded tablespoons of batter and place on baking tray. Sprinkle each cookie lightly with a pinch of sea salt.
Bake at 350 degrees for approximately 7-8 minutes until the outside looks slightly cracked. Be very careful not to over bake cookies because they will continue to bake as they cool once removed from the oven. Cookies should be soft and gooey in the center.

For a chunky and different twist add one of the following: 3/4 cup toasted pecans or pistachios, 1/4 cup chopped candied ginger, or 1/3 cup sweetened coconut

CHOCOLATE ANGEL FOOD CAKE: National Angel Food Cake Day!

Today is National Angel Food Cake Day. In case you were worried that there would be no chocolate, I have a go-to recipe for Chocolate Angel Food Cake. Recipe from Martha Stewart! This cake is light and airy and delicious... truly angelic!

Angel food cake is a cake made with a lot of egg whites and usually no shortening or leavening agent. It has the consistency of a sponge cake.

From WhatsCookingAmerica.net comes this piece of information about Angel Food Cake: 

Angel Food Cake is also known as ice cream cake (a Pennsylvania Dutch wedding cake). And, because there are an abundance of cake molds in southeastern Pennsylvania, one of the major producer of cake molds, angel food cake may have originated there in the 1800s. Some other historians think that the first angel food cakes were baked by African slaves in the South because making this cake required a strong beating arm and lots of labor to whip the air into the whites (pre-egg-beaters 1865). Angel Food cakes are also a traditional African-American favorite at funerals. You decide, but whatever the origin, you'll love this cake!

CHOCOLATE ANGEL FOOD CAKE

Ingredients
1 1/2 cups sugar
Scant 1 cup cake flour (not self-rising)
1/4 cup cocoa powder
1 tsp baking soda
1/2 tsp salt
1 ounce dark chocolate, grated (about 1/2 cup)
12 large egg whites
1 tsp cream of tartar
1 tsp pure vanilla extract
1/4 tsp pure almond extract

Directions
Preheat oven to 350 degrees. Place oven rack in center.
Sift together onto piece of parchment paper: 3/4 cup sugar, flour, cocoa powder, baking soda, and salt. Add grated chocolate; set aside.

In bowl of electric mixer fitted with whisk attachment, beat egg whites and cream of tartar until soft peaks form. With machine running, add remaining 3/4 cup sugar in slow steady stream, beating until fully incorporated and stiff glossy peaks form. Add vanilla and almond extracts; beat to combine.

Remove from mixer. Gradually add flour mixture, gently but thoroughly, folding into egg-white mixture until fully combined. Pour into nonstick angel food cake pan. Tap pan on counter to remove air bubbles. Bake until cake springs back when depressed with finger, 30 to 35 minutes.
Cool, inverted, 1 hour before removing pan.

Friday, October 9, 2026

BLUE CHEESE TRUFFLES: Moldy Cheese Day!

October 9 is Moldy Cheese Day. Don't you just love the name Moldy Cheese Day? Perfect for October! 

For me, Moldy Cheese means Blue Cheese. O.K. I know there are a lot of other moldy cheeses out there, but give me a good Stilton or Gorgonzola any day. So in honor of Moldy Cheese Day, I'm making Blue Cheese Truffles. Simple and delicious.

Scroll down for an easy recipe for Blue Cheese Truffles (I'd call them Moldy Cheese Truffles, but I fear no one will eat them).

No time or inclination to make your own? There are several Chocolate companies that offer fabulous Smokey Blue Cheese Truffles. I really like Lillie Belle Farms from Southern Oregon. I've tasted them at the San Francisco International Chocolate Salon, and they're delicious. Organic milk chocolate, Rogue Creamery's smoked blue cheese and toasted almonds. It's an awesome combination.

My other favorite blue cheese truffles are Bissinger's Chocolate-Covered Point Reyes Original Blue Cheese Wine Grape. They're a great combination of sweet and savory. I'm a sucker for chocolate and cheese, and local Point Reyes Original Blue is one of my favorite blues. Add a wine grape to that, and I'm in heaven.
 
But, of course, you can make your own Blue Cheese (Moldy Cheese) Truffles! This recipe is adapted from Harold McGee's Cookbook On Food and Cooking. Remember that the taste will change depending on the chocolate and cheese you choose! Choose a mild blue cheese to start.

BLUE CHEESE TRUFFLES

FILLING
2 ounces Blue Cheese, room temperature
1 Tbsp superfine sugar
2 ounces Dark chocolate (70% cacao), finely chopped

COATING
6 ounces dark chocolate (70% cacao), finely chopped

Make sure the cheese is at room temperature.

In mixing bowl, combine cheese and sugar and mix until sugar dissolves.
Melt filling chocolate in top of a double boiler (or saucepan over saucepan) over simmering water.

Use 2 ounces for blue cheese fillings. Make sure cheese is at room temperature and very soft. If it is too firm, microwave very briefly to soften.

Combine melted chocolate, superfine sugar, and cheese and work together with a wooden spoon or flexible spatula until the mixture is homogeneous. (This may be easier if you add a few drops of water or a little butter.) If mixture is too soft to shape, refrigerate 15 to 20 minutes.

Roll portions of mixture into 1/2-inch balls and refrigerate 15 to 20 minutes.
Melt and temper coating chocolate. Dip cheese balls in tempered chocolate, letting excess drain off. Allow to set at room temperature. Keep in cool place and serve on same day.

Note: Cheese will resume fermentation if left at room temperature, so this is one case where truffles should be refrigerated if kept for more than a day. Place on a sheet or tray and wrap snugly in waxed paper, then plastic wrap, before refrigerating. Allow to warm to room temperature before unwrapping.

Thursday, October 8, 2026

National Fluffernutter Day: Chocolate Fluffernutter Sandwich

I post about Fluffernutter Sandwiches most every year, because I meet people who don't know what a Fluffernutter Sandwich is, and I feel I should enlighten them. LOL. The Fluffernutter sandwich—a classic New England treat-- is made with white bread, peanut butter, and Marshmallow Fluff. 

Today is National Fluffernutter Day. Fluffernutter sandwiches must contain Marshmallow Fluff. I always have a jar in my pantry. 

Marshmallow Fluff is not just any marshmallow crème. Fluff has been manufactured by Durkee-Mower of Lynn, Massachusetts since 1920, and is the preferred brand of the northeast. This gooey, spreadable, marshmallow-infused confection is used in countless recipes and found in a variety of baked goods—from Whoopie Pies and Rice Krispies Treats to chocolate fudge and beyond.

And beyond that lies the best concoction of all: the Fluffernutter sandwich—a classic New England treat made with white bread, peanut butter, and Fluff.

History of Marshmallow Fluff:

A sweet marshmallow-like spread called Marshmallow Creme was invented in 1917 by Archibald Query in Somerville, Massachusetts. In 1913 during World War I, Emma and Amory Curtis of Melrose, Massachusetts invented Snowflake Marshmallow Creme and published a recipe for a peanut butter and marshmallow creme sandwich, which is the earliest known example of a Fluffernutter. Query sold his recipe for Marshmallow Creme to Durkee-Mower, Inc in 1920, who renamed it Marshmallow Fluff. Over 100 years later they continue to sell it under that name today.

It was in 1960 that the term Fluffernutter was created by an advertising agency for Durkee-Mower in an attempt to effectively market the peanut butter and marshmallow sandwich. See the 1960s ad and jingle explaining the recipe below. How Retro!

So if the Fluffernutter sandwich is a classic New England treat made with white bread, peanut butter, and Marshmallow Fluff, it can only be better if you add chocolate. And, for me, press the sandwich in a panini press! 

Want to make your own Marshmallow Fluff? https://livforcake.com/homemade-marshmallow-fluff/

Chocolate Fluffernutter Sandwich:

Chopped dark chocolate, Marshmallow Fluff, Chunky peanut butter, soft good white bread - pressed hot in a panini press!

Have a Chocolate Fluffernutter Sandwich today!  

Wednesday, October 7, 2026

Starbucks CopyCat Oreo Frappucino: Frappé Day

Today is Frappé Day. Most of us have a frappé of one kind or another in our lifetime.

A frappé is an iced beverage that has been shaken, blended, or beaten to produce a foamy cold blended drink, often with whipped cream and toppings. Ice can be added before or after beating the coffee and adding other ingredients such as sugar, milk, vanilla, and sweet sauces. It really depends on what you are shaking or blending it in - a shaker, frappe maker, or blender. According to one source, an ice-crushing blender is better than a shaker for blending a frappe. Traditionally frappés are made with coffee, but you can make other frappé drinks with tea, juice, or hot chocolate.

The word Frappé comes from the French word Frapper - which means to slap, knock, or beat. Cold coffee drinks named "café frappé" go back to the 19th century.

Which leads me to the Italian term: Frappuccino. In the last few years, I've had numerous types of Frappuccinos at Starbucks, most with chocolate. Here's a recipe for Starbucks' Oreo Frappuccino I found on StarbucksSecretMenu.net There are several 'Starbucks" secret menu recipes that you can order at Starbucks (you may need to know the recipe), but you can also make this at home. As always use the very best chocolate.

Starbucks CopyCat Oreo Frappucino

Ingredients
8 ounces whole milk
1 cup ice
2 scoops vanilla bean ice cream
2 Tbsp semisweet chocolate chips
1 Tbsp mocha syrup or chocolate syrup
1 Oreo
Whipped cream, for garnish
Crushed Oreos, for garnish

Directions
In a blender add milk, ice, vanilla bean ice cream, chocolate chips, mocha syrup, and an Oreo.
Blend until smooth. Pour into a glass, and garnish with whipped cream and crushed Oreos.

Tuesday, October 6, 2026

MAD HATTER CHOCOLATE CHIP SCONES: Mad Hatter Day!

Celebrate Mad Hatter Day with Mad Hatter Chocolate Chip Scones at a Mad Hatter Tea Party.

The unofficial Mad Hatter holiday was created in 1986 in Boulder Colorado by a group of computer technicians who were inspired by the Mad Hatter and his antics in Alice in Wonderland. In Lewis Carroll's book, the Mad Hatter is an eccentric milliner for whom time is forever stuck at a tea party with his friend the March Hare.

The date for the holiday was chosen because of how John Tenniel illustrated the Hatter in Alice in Wonderland. The English illustrator who was also a political cartoonist depicted the Hatter wearing a hat with a piece of paper that has 10/6 written on it. The 10/6 refers to the cost of a hat – 10 shillings and 6 pence. The creators of the holiday who are from the United States where the date is written in the month/day (mm/dd) format took this to set the date for the holiday on October 6 (10/6). For those who write the date in the day/ month (dd/mm) format, the holiday would fall on June 10.

Planning to host a Mad Hatter Tea Party? Then be sure and serve Chocolate Chip Scones (not that the Mad Hatter offered Alice anything at all!). Add some clotted cream and jam, don your hat, and you're good to go!   

MAD HATTER CHOCOLATE CHIP SCONES

Ingredients
1 3/4 cups all-purpose flour
1/3 cup granulated sugar
2 tsp baking powder
1/2 tsp salt
5 Tbsp unsalted butter, chilled and cubed
1/2 cup miniature semisweet chocolate chips
3 Tbsp orange juice (without pulp)

Directions
Preheat oven to 400. Spray baking sheet with nonstick cooking spray.
In large bowl, whisk together flour, sugar, baking powder, and salt. With pastry blender or large fork, cut in butter until mixture resembles coarse crumbs. Stir in chocolate chips. Mix in orange juice to form dough.
Turn out dough on floured surface. Pat or roll into 9 inch circle about 1/2 inch thick.
With 2 -1/2 inch fluted biscuit cutter, cut out 12 scones, pushing dough scraps together for last few, if necessary.
Transfer scones to baking sheet.
Bake in preheated oven until golden brown, about 12 minutes.
Move to wire racks to cool.
Serve with clotted cream and jam!

Monday, October 5, 2026

CHOCOLATE APPLE BROWN BETTY: Apple Brown Betty Day!

Now that it's Fall, it's time for Apple Brown Betty, one of my favorite classic desserts. A Brown Betty is a traditional American dessert made from fruit and sweetened crumbs. Similar to a cobbler or apple crisp, the fruit is baked, and, in this case, the sweetened crumbs are placed in layers between the fruit. Since this is a chocolate blog, I'm adding chocolate, of course. So celebrate National Apple Brown Betty Day today with this Chocolate Apple Brown Betty!

CHOCOLATE APPLE BROWN BETTY

Ingredients
2 pounds apples, peeled, cored and chopped (roughly)
3/4 cups packed brown sugar
3/4 cups fresh breadcrumbs
3 1/2 ounces dark chocolate, roughly chopped
1/2 cup unsalted butter, melted
2 Tbsp golden syrup
1/2 tsp salt

Directions
Preheat oven to 350 F.
Mix apples, 1/4 cup sugar, and 2 Tbsp water in buttered 8 x 8 ovenproof serving dish. Bake for 40 minutes, or until apples have started to soften, then mash roughly with fork. Mix remaining sugar with breadcrumbs, chocolate, butter, golden syrup and 1/2 tsp salt. Spoon on top of the mashed apples. Return to oven for 15 minutes, or until golden brown.

Serve with whipped cream or ice cream.

Sunday, October 4, 2026

VANILLA MACADAMIA NUT FUDGE: Macadamia Nut Day!

Today is National Macadamia Nut Day. Celebrate! Here's a great and easy recipe for Vanilla Macadamia Nut Fudge. This fudge reminds me of Hawaii!

This recipe comes from the Nestle Toll House site, but I've adapted it by using  pure vanilla extract and Guittard White Chocolate. Make sure you're using 'real' white chocolate and not the fake stuff!

VANILLA MACADAMIA NUT FUDGE

Ingredients

Unsalted Butter
2 1/2 cups sugar
2/3 cup unsweetened coconut milk
1/2 cup unsalted butter
2 cups White Chocolate chips or 2 cups chopped white chocolate (make sure it's 'real' white chocolate)
1 jar (7 oz) marshmallow crème (marshmallow fluff)
3/4 cup macadamia nuts, chopped (must be fresh)*
1 tsp pure vanilla extract
1/4 tsp coconut extract

Directions

LINE 9-inch-square baking pan with foil, extending foil over edges of pan. Grease foil with butter. Butter sides of 3-quart heavy-duty saucepan.

COMBINE sugar, coconut milk, and 1/2 cup butter in prepared saucepan. Cook over medium heat, stirring frequently, until mixture boils. Clip candy thermometer to side of pan, making sure bottom of thermometer doesn't touch bottom of pan. Reduce heat to medium-low. Continue boiling at moderate, steady rate without stirring, until thermometer registers 238° F, softball stage (about 15 minutes). Adjust heat as necessary to maintain a steady boil. Remove from heat.

STIR in white chocolate until melted and smooth. Stir in marshmallow crème, nuts, vanilla, and coconut extracts until well combined. Transfer mixture to prepared baking pan; cool for 3 to 4 hours or until firm.

LIFT from pan; remove foil. Cut into 48 pieces. Store tightly covered.

Friday, October 2, 2026

COCONUT CREAM PIE FROM SCRATCH: International Coconut Day!

Today is International Coconut Day! Here's a great recipe for Coconut Cream Pie from Scratch. Even though I love this advertisement on the right is from 1947 for "A Dreamy Creamy Coconut Pie You Can Make At Home-in Minutes," believe me when I say take a few more minutes to make your own Coconut Cream Pie from scratch, and it will be 100% better!

The following recipe is adapted from Southern Living (April 2005) and also appeared in one of the Best of Southern Living collections. It's worth the time to make this great Coconut Cream Pie from Scratch.

COCONUT CREAM PIE FROM SCRATCH

Coconut Cream Pie Filling
1/2 cup sugar
1/4 cup cornstarch
2 cups half-and-half
4 egg yolks
3 Tbsp unsalted butter
1 cup sweetened flaked coconut
1 tsp vanilla extract
2 cups whipping cream
1/3 cup sugar
2 1/2 tsp vanilla
Garnish: toasted coconut

Directions

Chocolate Pie Crust
2 cups chocolate wafers
6 Tbsp unsalted butter

Melt the butter.
Put chocolate wafers in plastic bag. Close bag and crush with spoon or rolling pin until you have tiny pea-sized chocolate bits.
Combine melted butter with chocolate bits.
Press ingredients into 9-inch buttered pie pan. Be sure and go up sides.
Bake 10 minutes at 325°F. 

Filling:
Combine 1/2 cup sugar and cornstarch in heavy saucepan. Whisk together half-and-half and egg yolks. Gradually whisk egg mixture into sugar mixture; bring to boil over medium heat, whisking constantly. Boil 1 minute; remove from heat.

Stir in butter, 1 cup coconut, and 1 teaspoon vanilla. Cover with plastic wrap, placing plastic wrap directly on filling in pan; let stand 30 minutes (or put it in the refrigerator). Spoon custard mixture into prepared crust, cover and chill 30 minutes or until set.

Beat whipping cream at high speed with an electric mixer until foamy; gradually add 1/3 cup sugar and remaining 1-1/2 teaspoons vanilla, beating until soft peaks form. Spread or pipe whipped cream over pie filling.

Garnish with toasted coconut

*To make toasted coconut, heat oven to 350. Put coconut in a pie pan and spread out to about 1/4 inch thick. Toast in oven for about 3-5 minutes.. check to make sure it doesn't burn. 

HAPPY COCONUT DAY!

Thursday, October 1, 2026

Pumpkin Spice Chocolate Chip Quick Bread

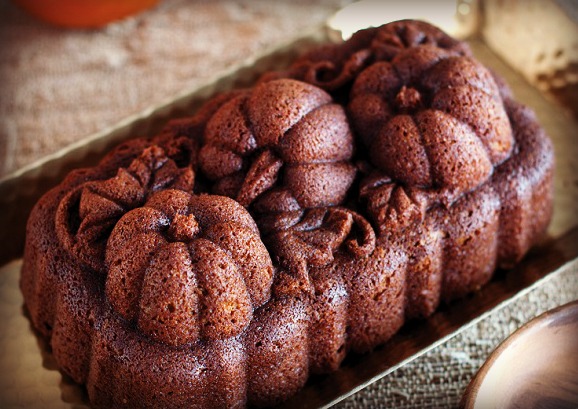
October 1 is National Pumpkin Spice Day. Pumpkin Spice is definitely a flavor associated with Fall, and sometimes overused, but this Chocolate Chip Pumpkin Spice Quick Bread is an easy and great way to celebrate the day -- and the season! Pumpkin spice (sometimes called pumpkin pie spice) is available in the market, but you can also make your own (scroll down for recipe). If you do make your own, remember to use the freshest spices to create your Pumpkin Spice blend.

The following recipe for Pumpkin Spice Chocolate Chip Quick Bread is from the Land O Lakes website. Want to 'spice' up the look of this pumpkin quick bread? Use a NordicWare Pumpkin Loaf Pan.

Pumpkin Spice Chocolate Chip Quick Bread

Ingredients
1 3/4 cups all-purpose flour
1 cup mashed cooked pumpkin (or 1 cup canned pumpkin)
3/4 cup firmly packed brown sugar
1/2 cup unsalted butter, softened
2 large eggs
2 teaspoons pumpkin spice**
1 teaspoon baking soda
1/2 teaspoon salt
1/4 teaspoon baking powder
3/4 cups mini semi-sweet chocolate chips

Directions
Heat oven to 350°F. Grease 9x5-inch loaf pan; set aside.
Combine all ingredients in bowl. Beat at medium speed, scraping bowl often, until well mixed.
Stir in chocolate chips so evenly distributed.
Spoon batter into prepared pan.
Bake 45-55 minutes or until toothpick inserted in center comes out clean.
Cool 10 minutes; remove from pan.
Cool completely.

**Make your own Pumpkin Spice
1 teaspoon ground cinnamon
1/2 teaspoon ground ginger
1/4 teaspoon ground nutmeg
1/4 teaspoon ground cloves