Pages

Saturday, August 31, 2019

S'MORES TRAIL MIX: National Trail Mix Day

Today is National Trail Mix Day! With Labor Day upon us, this is a great way to extend the summer. Mix up a batch of S'mores Trail Mix. Perfect for the Trail, an afterschool snack, or a lunch box treat.

Teddy Grahams, bear shaped graham cracker snacks, come in chocolate flavor, but the regular honey grahams cereal work best for a contrast of tastes and will make your trail mix more 'S'mores' tasting. There are all kinds of wonderful natural graham cereals, too.

S'mores Trail Mix

Ingredients
15 ounces Golden Grahams cereal (Teddy Graham cereal or a natural Graham Cereal)
16 ounces miniature marshmallows
12 ounces chocolate chips

Directions:
Empty all ingredients into a LARGE bowl or bag and mix.

Happy Trail Mix Day! Enjoy!


Friday, August 30, 2019

CHOCOLATE RICOTTA ICEBOX CAKE for Labor Day!

This Chocolate Ricotta Icebox Cake is perfect for Labor Day. Recipe adapted from Martha Stewart (2006), this Icebox Cake is great to make for a cookout. It's egg-less, so no worries about raw eggs in this dessert. Let your refrigerator do the baking! This cake is labor and egg free!

Love this Retro Refrigerator Ad from the 30s. I imagine your 'icebox' is a bit more up-to-date.

Chocolate Ricotta Icebox Cake

Ingredients
14 ounces dark chocolate (55-70% cacoa) - do not use chocolate chips
30 ounces part-skim ricotta cheese, room temperature
3/4 cup heavy cream
9 ounces chocolate wafers

Directions

Prepare pan:
Line 9″ springform pan with plastic wrap (or waxpaper) so that it completely covers bottom and sides of pan. Allow 4″ overhang over the sides of the pan (you'll fold this over the top the cake as it chills).

Make Chocolate Ricotta Mixture:
Break 12 ounces of chocolate into pieces.
Place in heatproof medium bowl set over pan of simmering water. Cook, stirring occasionally, until chocolate has melted, 8 to 10 minutes.
In food processor, blend ricotta until very smooth, about 1 minute, scraping down sides of bowl.
Add warm chocolate; blend until smooth.
In large bowl, beat cream until stiff peaks form.
With a rubber spatula, gently fold in chocolate-ricotta mixture.

Assemble cake:
Arrange half the cookies in an overlapping pattern to cover bottom of pan. Spoon half the chocolate-ricotta mixture on top of cookies; smooth top. Cover with remaining cookies; top with remaining chocolate-ricotta mixture, and smooth top.
Cover with plastic wrap; refrigerate at least 6 hours and up to 2 days.
Before serving, using a vegetable peeler, shave remaining 2 ounces chocolate over top of cake (or just eat the two ounces of chocolate)

Thursday, August 29, 2019

FLOURLESS BOURBON BROWNIES: Maker's Mark

I don't know about you, but I can never have too many brownie recipes. Here's an easy and tasty recipe from Maker's Mark for Flourless Bourbon Brownies!

FLOURLESS BOURBON BROWNIES

Ingredients
1¼ sticks unsalted butter, plus more for the pan
¼ cup Maker's Mark® Bourbon
¼ cup unsweetened cocoa powder
2 cups semi-sweet chocolate chips
4 large eggs
½ cup confectioners' sugar

Directions
Preheat oven to 325°F. Butter an 8-inch square baking pan, line with parchment paper or foil, and butter the parchment.
In large saucepan, heat butter and bourbon over medium heat, stirring occasionally, until butter melts. Stir in cocoa powder until smooth. Remove from heat and immediately add 1½ cups chocolate chips. Stir until smooth. Let cool slightly.
Add eggs, one at a time, beating well after each addition. Stir in confectioners' sugar until well-combined. Transfer to prepared pan and spread in even layer. Sprinkle remaining ½ cup chocolate chips on top.
Bake until top is glossy and toothpick inserted 1 inch from the edge comes out clean, about 20 minutes. Cool completely in pan on wire rack.
Lift out of pan using the parchment paper. Cut into 12 bars.

Wednesday, August 28, 2019

CHOCOLATE RED WINE BUNDT CAKE: National Red Wine Day

Today is National Red Wine Day. Thought you needed a special day for red wine?

I've posted many Chocolate and Red Wine recipes, but this is a favorite. You're going to love this perfect Chocolate Red Wine Bundt Cake!

The taste will improve with good quality dry red wine and the quality of the cocoa!

Want to decorate this cake for the upcoming Labor Day Holiday? Fill the center with whipped cream and top with strawberries and blueberries.

CHOCOLATE RED WINE BUNDT CAKE

Ingredients
2 cups flour
3/4 cup unsweetened cocoa powder (not Dutch process)
1-1/4 tsp baking soda
1/2 tsp salt
1 cup unsalted butter, softened
1-3/4 cup sugar
2 large eggs
1 tsp pure vanilla extract
1-1/4 cup dry red wine
Powdered sugar, for dusting

Directions 
Preheat oven to 350°
Butter and flour 12-cup bundt pan.
In bowl, whisk flour, cocoa powder, baking soda, and salt. In large bowl, using hand-held electric mixer, beat butter and sugar together until fluffy, about 4 minutes.
Add eggs, one at time, and beat until incorporated. Add vanilla and beat about 2 more minutes.
Work in two batches, alternately fold in dry ingredients and wine, until just incorporated.
Scrape batter into prepared pan, and bake for 45 minutes, until toothpick inserted in center comes out clean.
Let cake cool in pan 10 minutes, then turn out onto rack; let cool completely.
Dust cake with confectioner's sugar.

Chocolate and Red Wine: A Great Pairing

Tuesday, August 27, 2019

SHITAKE POTS DE CREME by Michael Recchiuti: National Pots de Creme Day

I'm a big fan of Recchiuti Chocolate. I often include their Ferry Building Shop (San Francisco) in our Scavenger Hunts and Chocolate Tours. The staff is so friendly, and the chocolate, well, it's just fabulous. Michael Recchiuti, owner and chocolatier, has been involved with chocolate for years.

Here's a recipe from 2010 on the Recchiuti website for Shitake Pots de Creme. These are perfect for National Pots de Creme Day! Michael Recchiuti came up with this unusual chocolate dessert from his 2009 Fungi & Chocolate Taste Project with Far West Fungi. Talk about unique! His advice is that since these custards are very rich, bake them in small espresso cups and serve for dessert. A little bit goes a long way. You can make them a day ahead and refrigerate, but be sure to allow them to come to room temperature.

Photograph: Recchiuti

SHITAKE POTS DE CREME
Makes 12 individual pots


Ingredients
¾ cup (5 ¼ ounces) granulated sugar cane
2 Tbsp (1 ounce) water
2 ounces dried Shiitake mushrooms
1 cup (8 ounces) whole milk**
2 cups (16 ounces) heavy whipping cream
5 (3 ¾ ounces) extra-large egg yolks
2 ½ ounces 41% milk chocolate, finely chopped

Directions
• Combine the milk and shiitake mushrooms in a saucepan and bring to a boil over medium heat, stirring frequently. Remove from heat, cover plastic wrap and steep mixture for at least 4 hours.

• Taste the milk mixture to ensure it has absorbed a good, strong shiitake flavor. Then re-heat mixture and pour it through a fine-meshed strainer. Discard the mushrooms. Re-measure the milk and adjust it to equal ¾ cup (6 ounces).

• Combine cream with mushroom-infused milk in a saucepan and bring to a boil over medium heat.

• While cream is heating, put the sugar and water in a medium heavy-bottomed pot. Use an unlined copper pan if you have one. Stir to mix the water and sugar. Place over medium heat and cook, stirring occasionally with a wooden spoon, until the sugar turns dark amber, 4 to 5 minutes. To check the color, dab a small amount of the syrup on a white plate. If any crystals form on the sides of the pan as the sugar darkens, wash them down with a wet pastry brush.

• When the sugar is the correct shade, remove the pan from the heat and put a sieve or spatter guard over it. Wearing an oven mitt, slowly pour the hot cream into the sugar syrup a little at a time. The mixture will splutter and foam. Be careful, as it is very hot. When the mixture stops bubbling, whisk it to incorporate any caramel stuck to the bottom.

• Place the egg yolks in a medium bowl, and whisk by hand until blended. Whisk about ½ cup of the caramel mixture into the yolks to warm them gradually. Whisk in another 1 cup, and then whisk in the rest. Add the chocolate and whisk until it melts.

• Strain the custard through a fine-mesh sieve into a bowl.spoon the custard into twelve 2 ½ ounce espresso cups (or small, 3 ounce ramekins) filling them three-fourths full. Let the custard cool to room temperature.

• Preheat the oven to 300°F. Bring a large teakettle of water to a simmer.

• Put the cups in a large baking pan. Pour the hot water into the baking pan to reach halfway up the sides of the cups. Cover the pan with aluminum foil.

• Bake on the middle shelf of the oven until the tops are set but the entire custard jiggles when a cup is moved, about 25 minutes. Immediately remove the cups from the hot water. Let cool to room temperature.

• Cover the cups and refrigerate for at least 6 hours or up to overnight. Bring to room temperature before serving.

Saturday, August 24, 2019

FRESH PEACH PIE WITH CHOCOLATE CRUST: National Peach Pie Day

The other day was National Eat a Peach Day, this month is Peach Month, and today is National Peach Pie Day. Lucky for me there are many varieties of fresh peaches at the Farmers Market.

So today in honor of the holiday, I'm making a Chocolate Peach Pie. I've found that adding chocolate to the peach filling is way too sweet and gooey, so I'm keeping it simple. The chocolate in the following recipe is a traditional chocolate cookie crust made with chocolate wafers. The peach filling is also simple, but feel free to substitute your favorite peach pie filling.

Since peaches are in season (here in California), and there are so many different varieties to choose from, I'll be able to make a fabulous pie! This peach pie is best served chilled, but there are plenty of other recipes out there for a warm peach pie, if you prefer.

PEACH PIE WITH CHOCOLATE CRUST

CHOCOLATE CRUST

Ingredients
2 cups chocolate wafers
6 Tbsp unsalted butter (or salted if you're inclined)

Directions
Melt butter.
Put chocolate wafers in plastic bag and crush with spoon or rolling pin. Should be pea-size.
Combine melted butter and ground chocolate wafers.
Press ingredients into 9 inch buttered pie pan--bottom and up the sides.
Bake for 10 minutes at 325. Let cool.

FRESH PEACH FILLING

Ingredients
1 cup sugar
3 Tbsp cornstarch
Peeled Fresh Peach halves (pitted)
1/2 pint heavy cream

Directions
Mix sugar and cornstarch.
Cover inside of chocolate cookie crust with 3/4 of mixture. Go out to sides.
Arrange peeled peach halves around outside edge (insides of peaches up).
Fill in with other peaches until full.
Sprinkle rest of mixture over peaches.
Put cream inside each peach center.
Bake at 325 for about 30-40 minutes.
Chill and serve.

Thursday, August 22, 2019

CHOCOLATE PECAN TORTE: National Pecan Torte Day

August 22 is National Pecan Torte Day.  I've posted many chocolate pecan pie recipes, but a torte is not a pie. Here's a definition from Wiki:
A torte is a cake made primarily with eggs, sugar, and ground nuts instead of flour. Variations may include bread crumbs as well as some flour. Tortes are Central European in origin. The word torte is derived from the German word Torte, which was derived from the Italian word torta, which was used to describe a round cake or bread.
Tortes are commonly baked in a Springform pan. An element common to most tortes is sweet icing. (Exceptions include several French tortes, such as Gâteau Mercédès and Gâteau Alcazar.) When the cake is layered, a thick covering of icing is placed between the layers, and there is almost always icing on the tops and sides of the torte. A number of European tortes do not have layers.
Following are two recipes for Chocolate Pecan Torte. The FIRST is easier and fun to make! Lots of shortcuts. The SECOND is fabulous but much more involved. They're both very tasty! As always, a lot depends on the quality of your ingredients.

1. Chocolate Pecan Torte 
from Epicurean.com This recipe is fun to make, as well as easy and delicious. O.K. it's not traditional, but its great!

Ingredients:
No-stick flour and oil baking spray
1 prepared 8 or 9 inch pecan pie, thawed if frozen
1 box (about 1 pound 4 ounces) fudge brownie mix, makes a 9-by-13-inch pan
1/4 cup brewed coffee or water
2 tablespoons bourbon or other whiskey
1/2 cup vegetable oil
2 eggs, large or extra-large

Directions:
Heat oven to 325F. Spray interior of 9-inch springform pan with baking spray.
Cover surface of pie with plastic wrap and top with plate. Invert pie onto plate, and remove pie tin. Invert prepared springform pan over pie and then invert whole, so that  pie slides into pan. Remove plate and, using the plastic wrap to keep your hands clean, smash pie so it fills bottom of pan.
Mix brownie mix, coffee, bourbon, oil, and eggs in medium mixing bowl until smooth and texture of wet mud. Pour over pie and smooth top. Bake until sides are firm and top is crusty but center is still soft, about 50 minutes. Cool until pan is comfortable to touch; remove sides of pan and cool completely. Cut into wedges to serve.
***
This SECOND recipe won the $1000 1985 Woman's Day "Yummiest Chocolate Recipe Contest." I've changed it slightly, adding more chocolate and an apricot jam filling. This torte is more traditional and reminds me of a Viennese Torte. You can substitute raspberry or peach jam.

2. Chocolate Pecan Torte

Chocolate Pecan Torte:
12 ounces dark  chocolate (70% cacao-fair trade organic)
2 ounces unsweetened chocolate
1 1/4 cup pecans
3/4 cup softened unsalted butter
1 cup sugar
5 eggs, separated
1/3 cup sifted flour
2 Tbsp dark rum
2 tsp Madagascar vanilla

Apricot Filling:
1/3 cup apricot jam
1 Tbsp orange liqueur
2 Tbsp dark rum
2 tsp lemon juice

Chocolate Glaze:
6 ounces dark chocolate (65-70% cacao)
2 Tbsp heavy cream
2 Tbsp sweet butter

Decoration:
1/2 cup pecan halves
1 Tbsp sweet butter
1 Tbsp Apricot Filling

Directions
Preheat oven to 325 degrees.
Butter 9" springform pan and dust with cocoa, shaking out excess. Set aside.
In top of double boiler, over hot water, melt the two chocolates together. Stir until smooth, and completely combined. Remove from heat, and allow chocolate to cool slightly.
Using food processor, grind pecans fine with about 1/2 cup of the sugar. Add butter and remaining sugar, creaming together well. Beat in egg yolks, rum, and vanilla extract. Add flour and process with the rest. Add melted and cooled chocolate, and process again. It's quite dense.
Whip egg whites until they form stiff peaks. Mix about 1/3 of beaten egg whites into thick chocolate batter, then fold chocolate mixture into remaining whites, folding thoroughly.
Spread chocolate batter into prepared springform pan, and bake in preheated 325 degrees oven for 30 minutes or more, until toothpick inserted in center comes slightly moist.
Remove torte from oven, and allow to cool and settle in pan.
Take off springform, and transfer torte to its serving dish.

Sieve apricot jam into small saucepan. Add orange liqueur, rum, and lemon juice. Bring to boil, stirring. Reduce heat and simmer a moment, then remove pan. Reserve 1 tablespoon of finished glaze for pecan trim, and spread rest over torte. Allow apricot filling to set, then top with chocolate glaze.

In top of double boiler, over hot water, melt chocolate and cream together. Remove from heat, and stir in butter, whisking till smooth. Allow glaze to cool until it will spread smoothly over torte. Use metal spatula to smooth it evenly over top, and coat sides with thinner layer.

In small sauce pan, combine apricot glaze, and butter. Melt them together. Add pecan halves, and stir until all are coated. Drain nuts, and allow to set slightly, then press around edge of torte.

Wednesday, August 21, 2019

SPUMONI ICE CREAM CAKE: National Spumoni Day

Today is National Spumoni Day! Spumoni, not to be confused with zamboni, is a multicolored Italian ice cream. When I was growing up, it was usually a flavorless ice cream served in Italian restaurants at the end of a meal. It wasn't until I visited Italian friends that I tasted really good Spumoni.

By definition, Spumoni is a special Italian dessert made of layers of ice cream, whipped cream, candied fruit, and nuts. Each layer contains different flavors and ingredients. In traditional dessert kitchens, spumoni is often made of three layers of flavor: chocolate, pistachio, and cherry. Each layer of Spumoni ice cream may include more than flavored ice cream. The chocolate layer, for example, may include chocolate shavings or chunks. Sometimes the chocolate layer has crushed hazelnuts inside. Not only does the hazelnut add a lovely flavor to the chocolate, but it also compliments the pistachio layer. The pistachio layer, of course, almost always includes crushed pistachio nuts. Finally, the fruit layer of spumoni is usually made with candied fruit. The cherry layer is the most traditional fruit component to the dessert.
 
Not surprisingly Ben & Jerry's has a recipe for Spumoni Ice Cream Cake. It's so easy and delicious. I've added cherries and hazelnuts.


SPUMONI ICE CREAM CAKE

Ingredients
1 pint Ben & Jerry’s Cherry Garcia
1 pint Ben & Jerry’s Pistachio Pistachio
1 pint Ben & Jerry’s Chocolate Fudge Brownie
4 large brownies (homemade or store bought)

Toppings: Chocolate *Ganache
1 cup (8 oz) chocolate chips and 1 cup heavy cream
Cookie Crumbs – 4 chocolate sandwich cookies, crushed
Maraschino Cherries
Chopped Hazelnuts

Directions
In a silicone or metal baking pan/pie plate place a layer of brownies and push down firmly to make a thin layer of crust. Soften 1 pint of ice cream so it is soft enough to spread. Spread over crust and place in the freezer for 10-15 minutes, or until it's firm.
While that’s in the freezer, pull out another pint of ice cream to soften. Repeat step 2 for the remaining flavors until you have all three layers spread in the pan. Add either cookie crumbs or ganache as a topping, and return the cake to the freezer for at least 15 minutes.
Remove cake from freezer and cut into individual slices to serve. You may need to remove the cake and let it soften before slicing if left in the freezer for 30 minutes or longer. Add chopped hazelnuts and maraschino cherries.

*Chocolate Ganache: Place heat proof (glass or stainless steel) bowl over boiling water. Add 1 cup of cream to heat the cream to a low boil and remove from heat. Slowly add cream to chocolate pieces. Let the ganache cool, but while it’s still liquid use a spoon to drizzle the ganache over the cake.Top with Maraschino Cherries

Tuesday, August 20, 2019

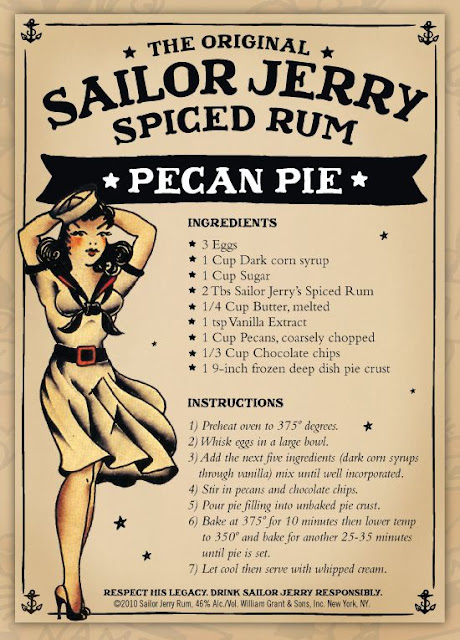
SPICED RUM CHOCOLATE PECAN PIE: National Chocolate Pecan Pie Day

Today is National Chocolate Pecan Pie Day. Funny..since I associate pecan pies with Thanksgiving and the Kentucky Derby, neither of which is in August. Nevertheless, even though I've posted over 20 Chocolate Pecan Pie recipes, this one from Sailor Jerry Spiced Rum is different. I often use bourbon in my pecan pies, so rum is a good alternative. Celebrate National Chocolate Pecan Pie Day.


Monday, August 19, 2019

WOODSTOCK 50th ANNIVERSARY TIE-DYE S'MORES BROWNIES

I couldn't let the 50th Anniversary of Woodstock pass without posting a recipe to celebrate. Here's a great and easy recipe for Woodstock Tie-Dye S'mores Brownies, slightly adapted from the Heinen's Grocery Store blog. You'll love this combination of Graham Cracker Crust, Brownies, and White Chocolate Fudge in multiple 'tie-dyed' colors.

WOODSTOCK TIE-DYE S'MORES BROWNIES

Ingredients 
1 3/4 cups graham cracker crumbs
6 Tbsp unsalted butter, melted
1/2 tsp vanilla
1 box (20 oz) brownie mix  (or make your own)
1 egg
1/2 cup canola oil
1/4 cup water
1 1/2 cups white chocolate chips
1/2 can (7 oz) sweetened condensed milk
1/3 cup marshmallow fluff
1 Tbsp butter
Food coloring (see directions below) Wilton makes food coloring gels

Directions 
Preheat oven to 325 F. Line 8×8 inch baking pan with foil, leaving additional foil to hang over sides. Spray bottom and sides of foiled pan with nonstick baking spray. Set aside.
Prepare graham cracker crust.
In small bowl, combine graham cracker crumbs, melted unsalted butter, and vanilla. Press firmly into prepared baking pan.
In medium bowl, combine egg, canola oil, and water. Stir to combine. Add brownie mix and stir to combine. Pour and spread into baking pan on top of graham cracker crust. Bake for 40-45 minutes. Ten minutes before brownies have finished cooking, begin preparing white chocolate marshmallow fudge. Microwave white chocolate chips, sweetened condensed milk and butter in  microwave safe bowl on 50% power until 90% melted, about 2 minutes. Check multiple times during microwave process to make sure you do no over-microwave. Stir until smooth and completely melted. Stir in marshmallow fluff. Working quickly, divide microwaved fudge into 7 bowls.
Make red, yellow, green, blue, orange, and purple colored fudge by adding drops of food coloring and stirring to your desired color. Leave one bowl uncolored. Remove brownies from oven. While still hot, drop colored fudge by spoonful directly onto hot brownies. Swirl with bamboo stick or toothpick to create tie-dye effect.
Refrigerate until completely set, at least 4 hours or overnight.
To serve, remove from baking pan using foil overhang. Use sharp knife to cut, rinsing between each cut.

Turn up the music and eat!

Sunday, August 18, 2019

ICE CREAM PIE DAY: Retro Ad & Recipe

Today is Ice Cream Pie Day! Perfect weather to celebrate! This Baker's Ads with recipe is from 1953, and the recipe is still great. I've made it. Love that "It's a dream with cherry vanilla ice cream!" That's a blast from the past. Today I make it with Ben & Jerry's Cherry Garcia--love the extra chocolate chunks! Also good with Chunky Monkey.. Bananas, coconut and chocolate.. what could be wrong? Also, you'll love the Chocolate-Coconut Crust.


Saturday, August 17, 2019

Cartoon of the Day: Honey Bee Day

Today is National Honey Bee Day. Here's a great cartoon from my favorite cartoonist -
Hilary Price at Rhymes with Orange. What's your favorite honey?


Friday, August 16, 2019

SAILOR JERRY SPICED CHEESECAKE BROWNIES: National Rum Day

I love the Sailor Jerry Recipe Ads. The ads may be a bit 'spicy' for some tastes, but not the tasty spicy recipes. So what better Recipe Ad to post on National Rum Day than one for Sailor Jerry Spiced Cheesecake Brownies.


Don't want to Bake? Make one of these Sailor Jerry Rum Drinks!


Thursday, August 15, 2019

CHOCOLATE LEMON MERINGUE PIE: Pie in the Sky!

Today is National Meringue Pie Day and what could be better than a Chocolate Lemon Meringue Pie. I love lemon and chocolate!  (Photo is from a Vintage ad for "Jello" pie filling, but I use Meyer Lemon Curd for the filling.)

There are so many recipes for Lemon Meringue Pie. You can make your own lemon filling and your own pie shell, but here's a simple and easy recipe that uses Chocolate Ganache (I always have some in the freezer--but you can make fresh), artisan Meyer Lemon Curd from a jar, and a pre-made pie shell (I use Trader Joe's pie dough). O.K. you'll be making the meringue, but that's o.k. it's fun and fast.

EASY CHOCOLATE LEMON MERINGUE PIE

Directions
Use a pre-made 9" pie shell. Prick and bake as directed.
Let Pie shell cool.
Add a layer of Chocolate Ganache (see chocolate ganache recipe). Warm it up first, so you can easily spread evenly to the edges.
Refrigerate for 15 minutes.
Warm Lemon Curd (to allow it to spread easily) and then add it to make a layer on top of the chocolate ganache. Spread gently and evenly to the edges--don't mix the two, if possible.
Top with Meringue (see directions below)
Bake at 350 for 10-15 minutes.

Meringue Topping:
4 egg whites
Pinch of cream of tartar
2 Tbsp sugar

Whisk together egg whites and cream of tartar in bowl of mixer. Beat whites until peaks form and then gradually add sugar. Keep beating mixture until stiff peaks form-about one to two minutes.
Using a spoon, place spoonfuls of meringue over surface of entire filling. Meringue should cover the filling completely to edge of crust.
Bake for 10 to 15 minutes --until meringue has golden tips.
Remove pie from oven and place on wire rack to cool before slicing.

Happy Lemon Meringue Pie Day!

Wednesday, August 14, 2019

CREAMSICLE WHITE CHOCOLATE CHIP COOKIES: National Creamsicle Day

Today is National Creamsicle Day. I haven't had a Creamsicle in years, but I did occasionally buy one from the Good Humor Truck. My cousin Herbie was a Good Humor Man in the summers. I loved to hear the Good Humor bell. We all came running.


What exactly is a Creamsicle? A Creamsicle is a frozen dessert with a vanilla ice cream core and a fruit sherbet coating. The classic Creamsicle flavor combination is orange and vanilla. Officially, the term “Creamsicle” is a registered brand name owned by Unilever, and similar products cannot be labeled as Creamsicles. However, the original Creamsicle® is such a perennial best-seller that the term is often used generically, and the branding rights may eventually be lost due to trademark dilution. 

But since this is a chocolate blog, I thought I'd post a recipe for Creamsicle White Chocolate Chip Cookies. These cookies are soft and moist. With the addition of orange zest and orange extract, you'll taste the tartness of the citrus as it combines with the sweetness of the white chocolate chips. These cookies definitely have the flavors of a Creamsicle.

Creamsicle White Chocolate Chip Cookies

Ingredients
2 1/2 cups all purpose flour
3/4 tsp baking soda
1/2 tsp salt
1 cup unsalted butter, softened
1/2 cup sugar
1/2 cup firmly packed brown sugar
1 large egg
1 tsp vanilla extract
1/2 tsp orange extract
2 Tbsp orange zest
1 1/2 cups white chocolate chips

Directions
Preheat oven to 375 degrees.
In small bowl, combine flour, baking soda, and salt; set aside.
In large bowl, cream butter and sugars until light and creamy. Beat in egg, vanilla, and orange extract until smooth. Gradually add flour mixture until combined. Stir in orange zest and white chocolate chips.
Drop rounded teaspoonfuls onto parchment lined cookie sheets. Do not flatten cookies.
Put in refrigerator for 30 minutes (do not skip this step). This will prevent spread, and that's important to these cookies which are soft and puffy.
Bake 8 - 10 minutes or until golden brown around edges. Do not overbake! Cookies will be fat.
Cool for several minutes on cookie sheets before transferring to rack to cool completely.

Tuesday, August 13, 2019

DEEP FRIED CANDY BARS: Fair Food

If you've been to the State Fair in the past 20 years, you've probably tried some sort of fried food. Have you had Fried Mars, Milky Way, or Snickers Bars? Not so healthy, but oh so good.

You might think that Fried Candy Bars originated at U.S. State and County fairs, but you'd be wrong. This unique treat was invented in Stonehaven, Scotland, at The Haven Chip Bar. The first candy bar to be battered and deep-fried was a Mars Bar. What began as a dare between two chip cooks became an iconic fair food.

You can make this Fried Treat at home. For the following recipe, you can use Mars Bars, Milky Way, or Snickers, or almost any nougat/caramel combination bar. Hint: Chill the bars first to ensure none of the melting chocolate and caramel leaks into the oil. You can also put a stick through the bar before frying (for easier handling when eating), but don't take the bar out of the oil by the stick! Use tongs.

DEEP FRIED CANDY BARS

Ingredients
2 cups all purpose flour
1 cup corn flour
1/8 tsp baking soda
2 cups milk
1 cup vegetable oil
2 chilled full-size chocolate covered caramel/nougat candy bars (or 4-6 minis), chilled

Directions
Mix flour, corn flour, and baking soda in shallow bowl. Stir 1/2 milk into mixture, then add rest and stir again (it's a thin batter)
Heat oil in deep-fryer or deep skillet to 350 degrees (Be careful)
Dip candy bars in batter to coat
Carefully put coated candy bar into hot oil and fry for 2-3 minutes until golden.

Monday, August 12, 2019

CHOCOLATE & BRIE PANINI: National Panini Day

If you've been reading my blog, you know I love the combination of Bread & Chocolate. Since today is National Panini Day, I thought I'd post a variation of Giada de Laurentiis's recipe for a Chocolate & Brie PaniniI love sweet and salty! I love my panini press, especially the lovely grill marks it leaves on the panini. Yum Sugar, one of my favorite food sites, modified this recipe, and I totally agree. Less chocolate is better as in the recipe below, so the chocolate doesn't overpower the cheese. As in all of the recipes, I recommend using the very best ingredients. It really makes a difference--from the olive oil to the bread to the brie, to the chocolate.

A few other possibilities: try using ciabatta instead of sourdough. Don't have a panini press? You can make this as you would a grilled cheese sandwich. In a dorm? Try your iron as the press (you will need to clean it afterwards).

CHOCOLATE AND BRIE PANINI

Ingredients
12 slices sourdough bread (try ciabatta if you want a change)*
1/3 cup extra-virgin olive oil
12 ounces Brie cheese, thinly sliced
10 ounces dark chocolate, chopped
1/3 cup fresh basil leaves

Directions
Preheat panini press.
Brush both sides of bread with olive oil. Grill bread slices until they begin to turn golden, about 1 to 2 minutes.
Remove from panini press and place 2 ounces of cheese on 1 slice of bread (the bottom half), top cheese with 1/4 cup chopped dark chocolate, and a few leaves of basil. Top with another slice of bread. Continue with remaining sandwiches.
Return sandwiches to panini press until \chocolate begins to melt, about another 2 minutes.
Cut sandwiches into 2-inch wide rectangles or small triangles and transfer to a serving platter.

Sunday, August 11, 2019

CHOCOLATE RASPBERRY TART: National Raspberry Tart Day

Today is Raspberry Tart Day, not to be confused with Raspberry Cream Pie Day! For that holiday I posted a recipe for Black Bottom Raspberry Cream Pie! I favor Driscoll's Berries, especially since I can find them in the market year round. I live in California, so that's pretty easy. Driscoll's Berries are always sweet and fresh. I love raspberries!

So in honor of the day, here's a recipe for a Chocolate Raspberry Tarte (or Tart)! This recipe is adapted from the Art and Soul of Baking cookbook. Of course, I make a chocolate crust! The crust in this recipe is not the usual one I make from chocolate cookie wafers. This one is made using cocoa powder, and you'll taste the difference. Of course, use only the best ingredients -- the very best cocoa. The original recipe calls for making 15 tiny tartlettes, but you can also make one big tart (or a pie, if you only have a pie pan). A tart is usually made in a shallow fluted pan, usually with a removal bottom -- a tart pan. Tarts rarely have an upper crust.

For the jam at the end, I use Bonne Maman Raspberry Preserves, one of my favorites. Of course, if you make your own raspberry or strawberry jam, you'll wan to use that!

CHOCOLATE RASPBERRY TART!

Ingredients
4 ounces unsalted butter, softened
1/2 cup sugar
1 egg yolk
1 cup all purpose flour
2 1/2 Tbsp unsweetened DARK cocoa powder
3/4 cup raspberry jam (or strawberry)
4 ounces dark chocolate (65-75% cacao), chopped
1/2 cup heavy whipping cream
6 ounces fresh raspberries
1/2 tsp water
powdered sugar

Directions
Beat butter and sugar on medium speed for 3 minutes until smooth and creamy. Use spatula to scrape down bowl and beat another minute if there are lumps of butter. Add egg yolk, beat well, and scrape down sides.
Add flour and cocoa powder. Beat on low speed until dough comes together (but still has small to medium clumps) and looks moist with dark uniform color. Scrape down bowl. Use spatula to incorporate anything not mixed in.
Put dough in tart pan with removable bottom (or pie pan, if that's all you have). Press dough evenly along bottom and up sides of pan. (as with any pie dough, if it isn't working for you, stick it in the fridge for 15-20 minutes)
Use knife to cut off dough that is above top of pan (save left over dough for repairs). Put dough filled tart pan in fridge for 30 minutes. 
Preheat oven to 350 degrees with rack in lower third. Place dough filled pan on cookie sheet and bake for 15 minutes. Remove from oven and use any leftover dough to repair cracks. Bake another 8 minutes.
Remove tart pan to cooling rack and use rounded side of a spoon to press center down and make more room for filling. Let cool completely (in fridge, if you have to).
Put aside Tbsp of jam in small bowl. Spoon rest of jam to cover bottom of tart crust.
Put chocolate in heatproof bowl. Put heavy cream in small saucepan. Heat cream until it just starts to boil, then pour over chocolate. Begin whisking to blend completely and melt all chocolate. Pour ganache into crust.
Refrigerate tart for 1 hour or until filling is firm. Remove from fridge and arrange raspberries on top of tart.
Mix reserved Tbsp of jam with 1/2 tsp of water and heat in microwave for about 15 seconds. Brush jam mixture onto tops of arranged raspberries (just a little to make them shiny).
Serve immediately or refrigerate until ready to serve.
Optional: Sift with powdered sugar before serving.

Saturday, August 10, 2019

S'MORES APPLES: Gravenstein Apples for National S'mores Day

Happy S'mores Day! So many ways to enjoy this Girl Scout Treat. I'm in Sonoma County this weekend, home of Gravenstein Apples.


Gravenstein Apples have been a large part of the history of Sonoma County since the late 1800s when Nathaniel Griffith with the advice of Luther Burbank cultivated the Gravenstein Apple for commercial use. Nathaniel Griffith was born in Iowa in 1850 and at 24 moved West. He came to California in 1883 and bought 78 acres on Laguna Road. Griffith experimented with many kinds of apples but settled on the Gravenstein. The Gravenstein reportedly originated in Germany in the gardens of the Duke Augustenberg, Castle Graefenstein, Schleswig-Holstein.

Gravenstein apple trees once covered acres of Sonoma County, but much of it has been replaced with grape vineyards. The fruit has been declared a Heritage food, giving the apples a much needed boost in the marketplace. The trees were discovered in 1797 but didn’t really become popular until the late 1800s when Nathaniel Griffith began to cultivate them for commercial use. Over time, the variety’s use spread in the western U.S., but it was also a favorite in Nova Scotia, Canada and other cool-temperate areas.

Gravensteins are a late summer treat not to be missed. 

So here's an easy and delicious recipe to celebrate National S'mores Day!

S'mores Gravenstein Apples

Ingredients 
6 large Gravenstein Apples (don't have Gravensteins in your area? Use Granny Smith apples)
6 strong pointed bamboo sticks (or Wilton Caramel Apple Branch sticks)
1 (10.5-oz) bag miniature marshmallows
5 tablespoons unsalted butter
12 ounces chocolate, chopped  (or chocolate chips)
1 cup ground graham crackers

Directions
Wash and dry apples. Remove stems and skewer each apple with stick; set aside.
Line baking sheet with parchment paper. Refrigerate for 15 minutes.
Melt butter in saucepan and cook over low heat until melted. Add marshmallows and stir until melted.
Dip each apple in melted marshmallows mixture and transfer to prepared baking sheet. Place in fridge.
In meantime, melt chocolate. Put chocolate in saucepan over saucepan over simmering water. Stir until smooth.
Put ground graham crackers in bowl. Remove apples from fridge and dip apple into melted chocolate (about 2/3 way up) rotating to coat evenly.
Immediately dip chocolate-covered apple into ground graham crackers, and coat on all sides.
Repeat for all apples.
Put apples back on lined baking sheet. Refrigerate for 20 to 30 minutes.

Tip: Twist off apple stem. If skewer is blunt, sharpen with kitchen knife on on end (make diagonal cut). Push firmly into apple. If juice leaks out, blot with paper towel before dipping.

Want to get fancy? Serve on a bed of chocolate chips, crushed grahams, and mini-marshmallows.

Friday, August 9, 2019

DARK CHOCOLATE RICE PUDDING: National Rice Pudding Day

1899 Chocolate Ad
Today is National Rice Pudding Day, and of course, it's Chocolate Rice Pudding at my house. The following recipes are completely different, so try both and see which flavor you favor! Remember the final results will only be as good as your ingredients. Use the best! Both can be topped with fresh whipped cream.

1. DARK CHOCOLATE RICE PUDDING

Ingredients
1-1/2 cups milk
1/2 cup half and half
1/3 cup sugar
dash of salt
1 cup uncooked rice
3/4 tsp pure vanilla
3 ounces dark chocolate (75-85% cacao), finely chopped

Directions
Over low heat, bring milk, half and half, sugar, and salt to nearly scalding temperature. Hint: Milk will not simmer, but it will steam when stirred at the near-scalding point.
Add rice to milk and continue cooking over low heat, stirring occasionally, for 20 to 22 minutes, until rice is creamy and slightly soft.
Add vanilla and chopped dark chocolate to hot rice and stir until chocolate melts and becomes part of pudding.
Divide pudding into 4 ramikins or casserole dish and serve warm or chilled.

2. CINNAMON CHOCOLATE RICE PUDDING

Ingredients
2 eggs
3/4 cup sugar
1/4 tsp salt
1/8 tsp cinnamon
1/2 cup DARK cocoa
1/4 cup cold milk
1- 1/2 cups hot milk
1 cup hot cooked rice
1 tsp Madagascar vanilla

Directions
Beat eggs slightly.
Combine sugar, salt, cinnamon, & cocoa and slowly beat into eggs.
Stir in cold milk. Add hot milk and rice.
Cook until thickened, stirring constantly.
Stir in vanilla.
Pour into ramikins or put into casserole dish.
Serve warm or cold.

Wednesday, August 7, 2019

FROZEN CUSTARD DAY: History, Retro Signs, and Recipe

Tomorrow is National Frozen Custard Day. Frozen custard has always meant soft serve ice cream to me -- the kind that comes swirling out of a metal dispenser. Frozen Custard was never a substitute for ice cream, though, it was just different, and equally delicious.

So in honor of the holiday, I'm posting some Retro Ads and Signs for Tastee Freez & Dairy Queen. And, if you scroll down there's a recipe for Cheater Chocolate Frozen Custard.

The big question is what's the difference between ice cream and frozen custard? Ice cream is made from milk, cream, or a combination of the two, while frozen custard is made from milk, cream, and egg yolks. Also, while the machine used to make ice cream churns air into it to make it have a light mouthfeel, frozen custard is produced in a machine that barely incorporates air into it, which makes it denser.

History of Frozen Custard

From eHow:

The Dairy Queen Story 
According to the book The Cone with the Curl on Top, a history of Dairy Queen, J.F. McCullough and his son, Alex, opened an ice cream shop in 1927 in Davenport, Illinois. In the early 1930s, they moved to an ice cream factory in Green River, Illinois, and decided to find out if customers preferred ice cream before it was completely frozen, which was how they liked it best. The colder ice cream had less flavor than the softer version, they felt. After an experimental, all-you-can-eat sale in Kankanee, Illinois, where they found the softer ice cream was a success, they bought a machine from a street vendor in Chicago in 1939, had a machine company tweak the design, and sold their frozen custard exclusively to a store run by Sherb Noble in Joliet, Illinois, in 1940. They nicknamed the store Dairy Queen. They bought a second store in 1941, and a third that spring.


Carvel's Story 
According to National Geographic and The Nibble, Carvel's sold ice cream on the street in New York. After a flat tire in Hartsdale, New York, caused his ice cream to begin to melt, he sold the partially melted product as a new treat---and his customers loved it. He opened Carvel Frozen Custard in Hartsdale in 1934 and began to build a series of frozen custard shops along highways. He built a soft-serve machine in 1939.

The McCulloughs continued to improve the design of their soft-serve machine and expand their business. Carvel continued to expand its chain aggressively, too, as did another competitor, Tastee-Freez. By 1956, soft-serve ice cream consumption was increasing 25 percent every year, according to the U.S. Department of agriculture.


That same year, Tastee-Freez had 1500 stores, and Carvel had 500.

Carvel was a true innovator: he was the first to offer “buy one, get one free”; the first to franchise an ice cream store; and his patented glass building was copied by McDonald’s. Dairy Queen opened its first soft-serve ice cream store in Joliet, Illinois in 1940. Carvel’s Flying Saucer sandwich was introduced in 1951. 

CHEATER CHOCOLATE FROZEN CUSTARD
technique adapted from John T. Edge's The Truck Food via Oprah 
Makes one quart

Ingredients 
1/2 cup heavy whipping cream
1 Tbsp sugar
1/4 tsp vanilla extract
3 cups chocolate ice cream, softened

Directions
Using a handheld electric mixer, whisk cream in a large bowl until soft peaks form, 1 to 2 minutes. Add sugar and vanilla and continue whisking to make stiff peaks, about 30 seconds more.
Using a rubber spatula, stir in ice cream until well combined.
Transfer mixture to a large, resealable freezer bag and freeze until semi-firm (like frozen custard), 4 to 6 hours.
When ready to serve, remove ice cream from freezer and, if needed, knead bag until uniformly soft, about 30 seconds. (Cover bag with a towel to protect your hands from the cold.)
Snip off a corner of the bag to pipe ice cream into a cone, or simply scoop and serve.

Dairy Queen Cones

Tuesday, August 6, 2019

ROOT BEER FLOAT BUNDT CAKE: National Root Beer Float Day

Today is National Root Beer Float Day. Just an FYI: A&W Root Beer is giving away small Root Beer Floats today, so you might want to get over to an A&W store today.

So what exactly is a Root Beer Float? Well, a Root Beer Float is made from Root Beer and vanilla ice cream. To make a 'traditional' root beer float, add the root beer to a tall chilled glass, leaving a bit of room in top. Then slowly add a scoop of vanilla ice cream to the glass. Drizzle a small amount or root beer on top, and it will turn to foam. You might want to put a plate under the glass, because when the ice cream begins 'to float', it sometimes bubbles over! Sometimes people just mix the two together, but I like the very float-y way. A Root Beer Float is traditionally made with vanilla ice cream, but you can also make a Root Beer Float with Chocolate Ice Cream--it would be called either a brown cow or a black cow, depending on where you live. Each region in the U.S. has its own names. No surprise there!

But maybe you want to do something even more special than making an ice cream float to celebrate the day, but still maintain the root beer float flavor. And, you want to include lots of chocolate. I'm a huge fan of bundt cakes. They're easy and pretty! Well, then this recipe from the BrownEyedBaker is perfect. There's chocolate in both the Bundt Cake and the Frosting. Personally I rarely frost my bundt cakes, and I feel this cake has the flavor of the root beer float, but if you're all about frosting, make the frosting and ice the cake! Actually the frosting, itself, tastes like a root beer float! Lick the bowl!

Root Beer Float Chocolate Bundt Cake

Ingredients
2 cups root beer (not diet root beer)
1 cup DARK unsweetened cocoa
1/2 cup sweet butter, cut into 1-inch pieces
1-1/4 cups granulated sugar
1/2 cup dark brown sugar
2 cups all-purpose flour
1-1/4 tsp baking soda
1 tsp salt
2 eggs

Directions
Preheat oven to 325 degrees F. Spray10-inch Bundt pan with nonstick cooking spray, or butter pan and dust with flour, shaking out excess flour; set aside.
In medium saucepan, heat root beer, cocoa powder, and butter over medium heat until butter melts. Add sugars and whisk until dissolved. Remove from heat and cool.
In medium bowl, whisk flour, baking soda, and salt together.
In small bowl, whisk eggs until just beaten, then whisk into cooled cocoa mixture until just combined. Fold flour mixture into cocoa mixture. Do not overbeat. Lumpy is fine!
Pour batter into prepared pan and bake 35 to 40 minutes, rotating pan halfway through baking, until sharp knife inserted into cake comes out clean. Transfer pan to wire rack to cool. Loosen sides of cake from pan and turn onto rack.

Root Beer Float Fudge Frosting

Ingredients
2 ounces dark chocolate, melted and cooled slightly
½ cup unsalted butter, softened
1 tsp salt
¼ cup root beer
2/3 cup DARK unsweetened cocoa powder
2 -1/2 cups powdered sugar

Directions
Put all ingredients in food processor. Pulse in short bursts until frosting is shiny and satiny, scraping sides of food processor a few times. (You can always use hand mixer or standing mixer)
Using spatula, spread frosting over cake in a thick layer. Let frosting set before serving.

Sunday, August 4, 2019

ULTIMATE CHOCOLATE CHIP COOKIES: Retro Crisco Ad & Recipe

Today is National Chocolate Chip Cookie Day! One can never have too many chocolate chip cookie recipes! Following is a Retro Ad & Recipe for Crisco Ultimate Chocolate Chip Cookies!

I grew up with Crisco used as a shortening alternative in baking. I always wondered about this white goopy stuff. As a girl, I made many pie crusts with Crisco. Butter was always my choice, and lard was not an alternative in my mother's house. Actually all these shortenings make great pie crusts.. just different.

According to Wikipedia, Crisco is a brand of shortening produced by the J. M. Smucker Co. popular in the United States. Introduced in June 1911 by Procter & Gamble, it was the first shortening to be made entirely of vegetable oil. While the term Crisco is commonly used as a synonym for all shortening, Procter and Gamble markets olive, cooking, and baking oil and a cooking spray under that trademark.

Over the years, there were lots of Crisco pamphlets and cookbooks distributed as marketing incentives. So, I thought I'd post this retro recipe for "Ultimate Chocolate Chip Cookies" from Crisco. The recipe calls for "Butter Flavor Crisco all-vegetable shortening." Personally I would substitute real butter for Crisco in this recipe. Crisco does have its uses, but not necessarily in chocolate chip cookies. However, if you keep kosher, you might want to try this recipe. Disclaimer: I have not made these cookies; I just love retro ads and cookbooks and wanted to share.

CRISCO ULTIMATE CHOCOLATE CHIP COOKIES

3/4 cup Butter Flavor Crisco all-vegetable shortening
1-1/4 cups firmly packed light brown sugar
2 tablespoons milk
1 tablespoon vanilla
1 egg
1-3/4 cups all-purpose flour
1 teaspoon salt
3/4 teaspoon baking soda
1 cup semi-sweet chocolate chips
1 cup coarsely chopped pecans (optional)*

*If nuts are omitted, add an additional 1/2 cup chocolate chips.

Heat oven to 375°F. Place sheets of foil on countertop for cooling cookies.
Combine shortening, brown sugar, milk, and vanilla in large bowl. Beat at medium speed of electric mixer until well blended. Beat egg into creamed mixture.
Combine flour, salt, and baking soda. Mix into creamed mixture just until blended. Stir in chocolate chips and pecan pieces.
Drop rounded tablespoonfuls of dough 3 inches apart onto ungreased baking sheet.
Bake one baking sheet at a time at 375°F for 8 to 10 minutes for chewy cookies, or 11 to 13 minutes for crisp cookies. DO NOT OVERBAKE. Cool 2 minutes on baking sheet. Remove cookies to foil to cool completely.

Makes about 3 dozen cookies.

Saturday, August 3, 2019

Colonel Mustard in the Kitchen! CHOCOLATE MUSTARD BROWNIES

Today is International Mustard Day. Not only is there an international holiday, but there's also a National Mustard Museum, the home of the world's largest collection of Mustards and Mustard Memorabilia.

According to the National Mustard Museum website, in 1992, Barry Levenson left his job as an Assistant Attorney General for the State of Wisconsin to open this museum. There are more than 5300 mustards from all 50 states and more than 60 countries. For the collector in me, there's the Gibbons Collection of mustard pots, antique tins & jars and vintage advertisements. Located on Hubbard Avenue in the heart of downtown Middleton, Wisconsin, the National Mustard Museum is open from 10 am to 5 pm, seven days a week — except New Years, Easter, Thanksgiving, and Christmas. The online store never sleeps. Middleton neighbors Madison to the west, is only a 45-minute drive from Wisconsin Dells, just 2-1/2 hours from Chicago, and a mere 6,978 kilometers from Dijon, France.


But this is a Chocolate Blog, so why Mustard? Because Chocolate and Mustard go great together! I've posted a Spicy Chocolate Mustard Cookie recipe from Colman's Mustard. Add Merlot, and you're really speaking my language. What a wonderful blend of flavors.

The Napa Mustard Company has a wonderful Noyo Reserve Merlot 'n Chocolate Mustard.
It's great on pretzels and with sandwiches or just spread it on a piece of crunchy sourdough. It's sweet, salty, and tangy!

Hop Kiln, one of my favorite wineries in Sonoma County, makes their own Merlot & Chocolate Mustard. It has a lovely smooth taste. Use as above.

And adapted from a recipe from the National Mustard Museum,  here's a recipe for Chocolate Mustard Brownies created by Marliss Levin for  National Mustard Day celebration several years ago at The Mustard Museum. Mustard actually intensifies the taste of chocolate!

And, you might want to have some Mustard Ice Cream with that! French's makes one, and if you're not able to find it, here's a link to an easy recipe to make your own!


CHOCOLATE MUSTARD BROWNIES

Ingredients:
2 Tbsp Chocolate Merlot Mustard
1 tsp fresh ground espresso
1/2 lb unsalted butter
4 ounces unsweetened chocolate or very dark chocolate (85% or higher), chopped
2 cups brown sugar, packed
1 1/2 cup all purpose flour
4 eggs
2 Tbsp Vanilla
1 cup chocolate chips or 1 cup of chunks of dark chocolate
Sifted powdered sugar

Directions
Preheat oven to 350 degrees.
Mix ground espresso in mustard and set aside.
Melt butter and chocolate together in top of double boiler or a pot on top of another with simmering water. Cool slightly.
Add brown sugar to chocolate mixture. Blend well.
Add flour and mix well.
Add eggs and mix until blended.
Stir in vanilla; add mustard/coffee mixture. Mix until well blended.
Fold in chocolate chips or chunks.
Spread in greased 13" x 9" pan.
Bake 30 minutes or until toothpick comes out clean.
Cool and cut into squares.

Friday, August 2, 2019

S'MORES ICE-CREAM SANDWICHES: Nationl Ice Cream Sandwich Day

Today's National Ice Cream Sandwich Day! I love ice cream sandwiches. They're easy and perfect for summer! Here's an easy recipe from Betty Crocker that's a twist on S'mores Ice Cream Sandwiches. This recipe feeds a crowd! Invite the neighbors.

S'MORES ICE CREAM SANDWICHES

Ingredients
32 graham cracker squares
1/2 cup Betty Crocker Rich & Creamy chocolate frosting
1/2 cup marshmallow creme
1/2 gallon brick-style chocolate ice cream

Directions
Arrange 16 of the graham crackers in bottom of ungreased jelly roll pan, 15 1/2 x 10 1/2 x 1 inch. Spread frosting on top of each cracker. Spread marshmallow creme on one side of remaining crackers.
Cut ice cream crosswise into four 3/4-inch-thick slices. Cut each slice into fourths to make 16 pieces. (Freeze remaining ice cream for another use.) Place one ice cream piece on each cracker in pan. Top with remaining crackers, marshmallow sides down, pressing lightly.
Cover and freeze about 2 hours or until firm. Wrap each sandwich in foil or plastic wrap; store in freezer.

Photo: Betty Crocker

Thursday, August 1, 2019

BLACK BOTTOM RASPBERRY CREAM PIE: National Raspberry Cream Pie Day

Today is National Raspberry Cream Pie Day, and what's a raspberry pie without chocolate? So for this recipe, the cream portion of the pie is Chocolate Pudding!

This recipe is from Bon Appetit (July 2004) aka Epicurious for Black Bottom Raspberry Cream Pie. The "black bottom" is a layer of chocolate pudding.. and as a bonus I've added a chocolate cookie crust since I'm all about chocolate. Be sure and chill the pie overnight before adding the topping.

As far as berries go, any great raspberries works. I love Driscoll's raspberries because they're always good. This is raspberry season, so pick up a few pints today and make this incredible pie to celebrate National Raspberry Cream Pie Day!

FYI: This recipe is also a great black bottom 'anything' recipe: bananas and other fruit go very well with it, too.

Black Bottom Raspberry Cream Pie 

Crust
Nonstick vegetable oil spray
1 3/4 cups crushed chocolate wafer cookies (about 30 cookies from one 9-ounce package)
1/2 cup unsalted butter, melted
1/4 cup sugar

Filling
1/2 cup sugar
1/4 cup unsweetened cocoa powder (preferably Dutch-process)
2 Tbsp cornstarch
2 1/2 cups whole milk, divided
2 large egg yolks
1 large egg
4 ounces bittersweet (not unsweetened) or semisweet chocolate, finely chopped
2 Tbsp unsalted butter

Topping
3 1/2-pint containers raspberries
1 cup chilled whipping cream
2 Tbsp powdered sugar
1/2 tsp vanilla extract

For crust:
Spray 9-inch-diameter glass pie dish with nonstick spray. 
Blend cookie crumbs, butter, and sugar in medium bowl. 
Press mixture evenly over bottom and up sides (not on rim) of prepared dish.
Chill crust 30 minutes.
Preheat oven to 350°F. Bake crust until set, about 10 minutes, then cool.

For filling:
Combine sugar, cocoa, and cornstarch in heavy medium saucepan; whisk to blend well. 
Gradually add 1/4 cup milk, whisking until cornstarch dissolves. 
Whisk in remaining 2 1/4 cups milk, then egg yolks and egg. 
Stir over medium-high heat until pudding thickens and boils, about 8 minutes. 
Remove from heat. 
Add chocolate and butter; whisk until melted and smooth. 
Spread pudding in prepared crust. Press plastic wrap onto pudding to cover and chill pie overnight.

For topping:
Peel plastic wrap off pie. 
Cover chocolate layer with raspberries, pointed side up, pressing lightly into chocolate to adhere (some berries will be left over). 
Beat cream, sugar, and vanilla in medium bowl until peaks form; spread over berries on pie. 
Arrange remaining berries atop cream. 
Chill pie at least 1 hour and up to 4 hours.