Pages

Showing posts with label Sarah Husmann. Show all posts

Tuesday, November 5, 2024

PAIN AU CHOCOLAT (aka: Chocolate Croissant): Guest Post by Sarah Husmann

The weather has finally cooled, and I decided to try making Pain Au Chocolat again, otherwise known as Chocolate Croissant. The reason for making these when it’s colder is that the kitchen temp is cooler which helps keep the dough and butter cold when laminating. Lamination is the process of folding and rolling butter into dough over and over again to create super-thin layers. I ALWAYS have issues with this step, and my butter always leaks or bakes out leaving my Pain Au Chocolat flat with little to no flaky layers that one expects. I also previously made the mistake of making them when the kitchen was too warm.

I finally conquered the laminating process (for now.  LOL) and this batch of Pain Au Chocolat came out PERFECT! No leaking butter. Beautiful puffy, layers of flaky pastry. I also tried a different recipe. I’ve previously tried several others, but this one seems to be the winner. The only change to the recipe was I did an extra fold before rolling, cutting, and forming them.


***
FYI: I got to taste these, and I have to say they were the best Pain au Chocolat that I have ever tasted. Thanks, Sarah!  - Janet

Friday, October 18, 2024

What? It’s National Chocolate Cupcake Day, and I didn’t even know it! Guest Post by Sarah Husmann

Photo: Sarah Husmann
Sarah:

A couple of days ago I decided I wanted to bake something sweet, but I didn’t want to go grocery shopping, and I had all the ingredients for chocolate cupcakes. I took out the cold ingredients last night before bed so they’d be room temperature this morning, woke up, and whipped them up after lunch. And voila!  Chocolate cupcakes with chocolate buttercream frosting in less than an hour! Sometimes making something basic is just what you need. Simple, delicious and fast. After baking them, I found it was National Chocolate Cupcake Day, and I didn’t even know it! Coincidence or fate? LOL!

I did not make any changes to the recipes I used.

https://addapinch.com/chocolate-cupcakes-recipe/#wprm-recipe-container-31330

https://addapinch.com/perfect-chocolate-buttercream-frosting-recipe/#wprm-recipe-container-30670

Monday, September 16, 2024

Cinnamon Raisin Bread: Guest Post by Sarah Husmann


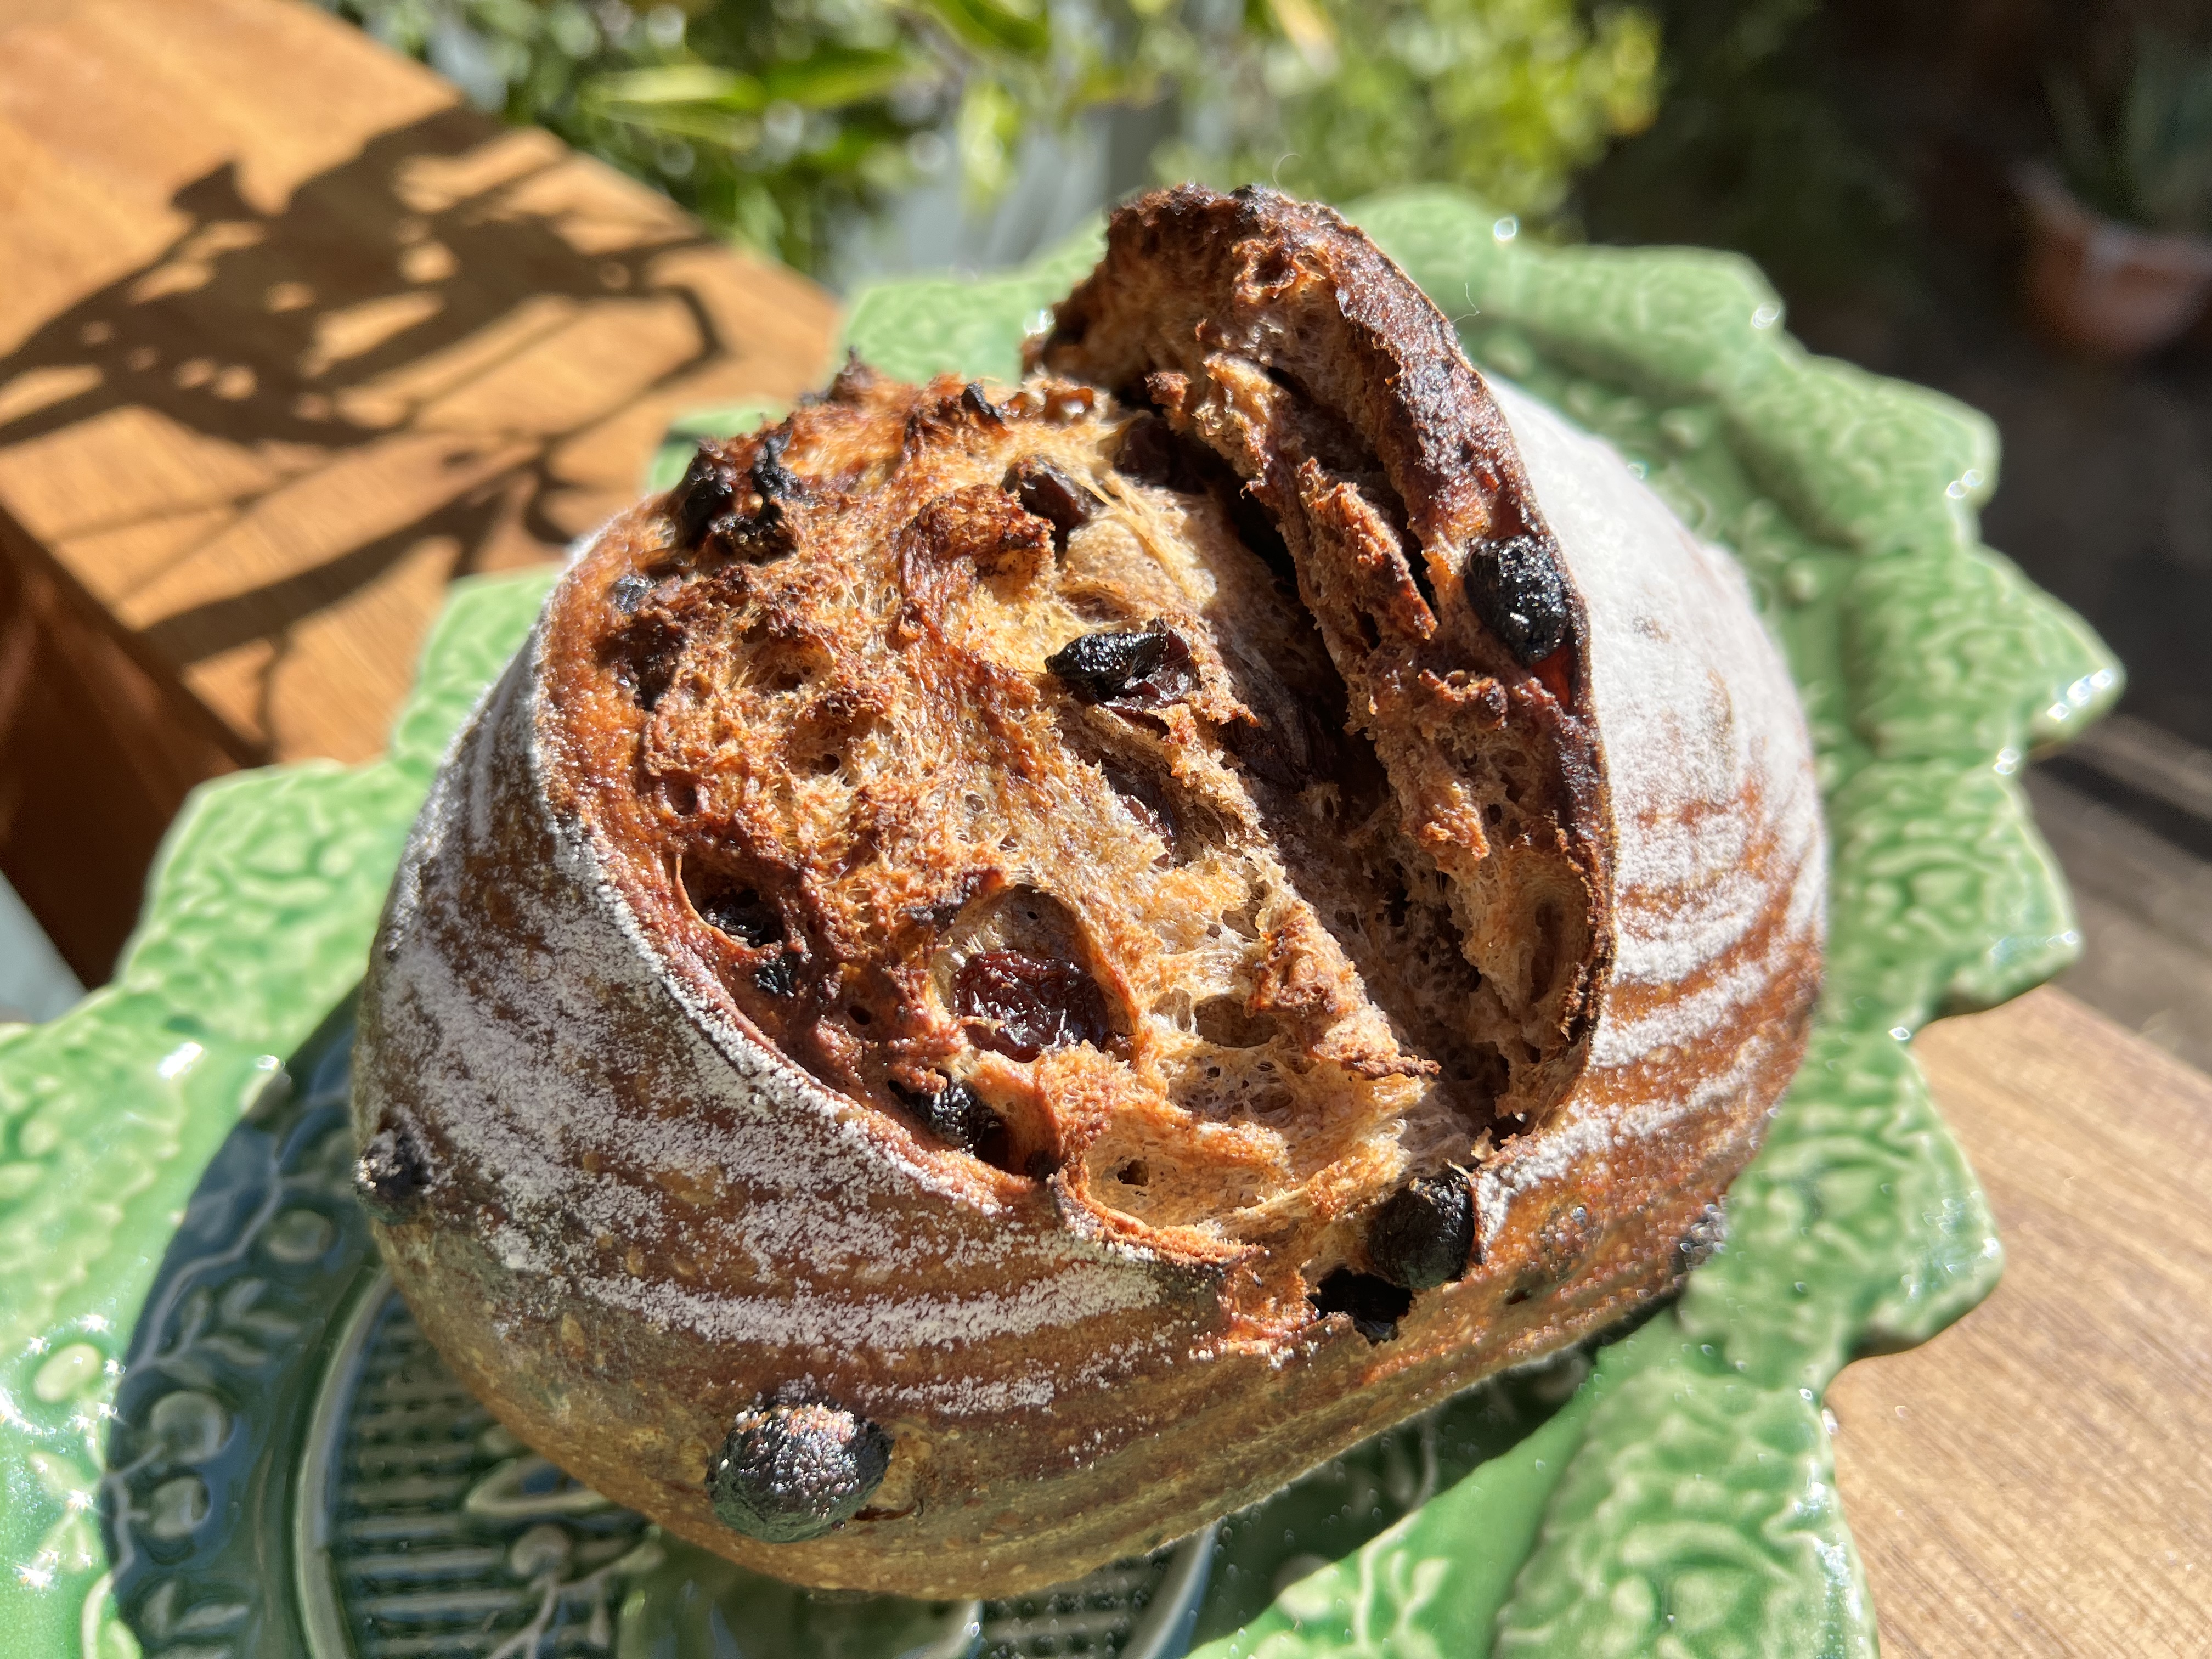
Today is 
National Cinnamon Raisin Bread Day, one of my favorite breads. There’s no chocolate in this recipe, but FYI, you can always substitute chocolate chips for raisins. Just saying. But for today’s holiday, I asked my favorite amateur baker and friend Sarah Husmann for some bread making tips. Of course it was serendipitous that she just made Cinnamon Raisin Bread the other day and gave me a boule! It was absolutely delicious. So here are some tips from Sarah and a link to the recipe she used. Enjoy! 


***

Sarah:  HAPPY NATIONAL CINNAMON RAISIN BREAD DAY!!!

I came across this recipe when I started my sourdough journey during the pandemic (like everyone else. LOL). It was the first, and continues to be, the only recipe that comes out perfect every time. And I mean EVERY single time! It has become my go to recipe when I crave sourdough. I also figured out how to make my levain in less time instead of overnight like the recipe calls for, so this cuts out about 8-12 hrs. Instead of making the levain the night before, I make it the day that I want to make the dough (this includes  the stretch & folds and shaping). To do this, I turn my oven on to the “keep warm” setting so it’s warming up while I make the levain. Then I turn the oven off and put my levain in. I check the warmth of the oven to make sure it’s not getting to cold and if it is, I’ll turn the ”keep warm” setting on again for a couple of minutes and turn off again. My levain is usually done in about 4 hrs. I’m not an early riser so this works perfect for me and even if I don’t get the levain started until noon, I can still get the stretch & folds, bulk fermentation, and shaping done before bed. Pop it in the fridge and the next morning you’re ready to bake! You can also cut the dough in half and make 2 smaller boules, which I like to do so I can give one away.
 

Here's a great TIP if you like the bottom of your loaves softer.

I have always had the bottoms of my loaves come out harder than I like and finally tried the tin foil hack.  I take a piece of tin foil and fold it into a narrow strip. Then make a circle out of the strip. Place your loaf on top of it during the bake. Of course if you have a cast iron or stainless steel trivet or an InstaPot insert, you can use those too. I made two only because I wanted support for the middle of the loaf, but you don’t need it.


CINNAMON RAISIN SOURDOUGH


Thursday, November 16, 2023

PUMPKIN CHOCOLATE CHIP PECAN BISCOTTI: Guest Post by Sarah Husmann aka Sarah RH

I’m Sarah (Husmann), and I am an amateur baker, bread maker, mixologist, and chef. I also LOVE books, cats, and trash tv. Janet and I became friends through our love of books. 

I always loved cooking with my mom, but I never really did any serious baking--until last year. With the holidays fast approaching, I was looking for new recipes to try. I’ve always wanted to make Biscotti, but I thought they would be too complicated. They're so delicious! So this year I decided to try. And, I was pleasantly surprised by how very easy they are to make.

The recipe for Pumpkin Pecan Biscotti (Barley & Sagethat I used calls for browned butter, and I have to say who DOESN’T love browned butter? Browned butter is easy to make, and I loved how it enhanced the taste of the biscotti.

The only adjustments I made to this recipe for Pumpkin Pecan Biscotti was adding 1 cup of semi sweet chocolate chips and using melted semi-sweet chocolate instead of white chocolate for drizzling on or dipping the biscotti.

PUMPKIN CHOCOLATE CHIP PECAN BISCOTTI

Ingredients

Biscotti
1/2 cup unsalted brown butter, room temperature
1/2 cup light brown sugar
1/2 cup granulated sugar
1 large egg room temperature
1 teaspoon vanilla extract
1/4 cup pumpkin puree
2 1/4 cups all purpose flour
1 1/2 teaspoons pumpkin pie spice (you can always make your own!)
1 1/2 teaspoons baking powder
1/4 teaspoon kosher salt
1/2 cup chopped pecans optional

Topping
4 ounces semi sweet chocolate melted (original recipe uses white chocolate)
chopped pecans

Directions
Preheat the oven to 350°F and line a baking sheet with parchment paper.

In the bowl of a stand mixer fitted with the paddle attachment (or a large bowl with a hand mixer), beat together the softened brown butter, sugar, and brown sugar until smooth.

Add in the egg and vanilla extract and beat until combined. Then beat in the pumpkin puree.

Add in the flour, pumpkin spice, baking powder, and salt and mix until fully incorporated.

Then stir in the chopped pecans if desired. The dough should be sticky.

Scoop half the dough onto one side of baking sheet and pat it into a 10 inch x 2 inch rectangle that’s about 1 inch thick (lightly wetting your hands helps a lot with this step). Repeat with the other half of the dough.

Bake for 20 to 30 minutes, until golden brown all over. Remove from the oven and let cool for 25 to 30 minutes.

Reduce the oven temperature to 325°F.

Carefully transfer the logs to a cutting board and use a spray bottle filled with room-temperature water to very lightly spritz them (just one spray on each section of the logs). Wait about 5 minutes before using a very sharp serrated knife to slice biscotti ½ inch wide.

Return the pumpkin biscotti slices to the baking sheet, standing them up with ½ inch in between them, so air can circulate around them. Bake for another 25 to 30 minutes, until dry and golden.

Remove from the oven and transfer to a wire rack to cool to room temperature.

Dip or drizzle the pumpkin biscotti in the melted semi sweet chocolate (or white chocolate) and sprinkle with chopped pecans.

Let the chocolate fully harden before storing.

Notes
Store biscotti in an airtight container at room temperature for up to 2 weeks.

To make brown butter:
Melt unsalted butter over medium heat, stirring frequently. Watch closely for the butter to develop brown specs and a nutty aroma. Once you start seeing brown specs, let cook for just a few seconds longer (watch very carefully or it will burn). Remove from the heat and pour into a small bowl so that it doesn't continue to cook. Set aside and let cool for about 20 minutes in the fridge until soft and pliable.