Pages

Wednesday, April 30, 2025

OATMEAL RAISIN CHOCOLATE CHIP COOKIES: A Two-Fer - National Oatmeal Cookie Day & National Raisin Day!

Today we celebrate two food holidays: Oatmeal Cookie Day and Raisin Day. Put the two holidays and their ingredients together, add Chocolate Chips, and make these delicious Oatmeal Raisin Chocolate Chip Cookies.

OATMEAL RAISIN CHOCOLATE CHIP COOKIES

Ingredients
1 1/2 cups all-purpose flour
1 tsp baking soda
1 1/2 tsp ground cinnamon
1 cup unsalted butter, softened
1/2 cup light brown sugar, firmly packed
1 cup granulated sugar
1 large egg
1 1/2 tsp pure vanilla extract
1 cup ground walnuts
1 cup old fashioned oats
1 cup semi-sweet chocolate chips
1 cup raisins

Directions
In small bowl mix flour, baking soda, and cinnamon.
In large mixing bowl beat butter, and sugars until light and fluffy. Beat in egg and vanilla.
At low speed, beat in flour mixture until blended.
Fold in ground walnuts, oats, chocolate chips, and raisins.
Cover with plastic wrap and chill for 1 hour.
Preheat oven to 350.
Grease 2 baking sheets.
Shape dough into 1-inch balls. Place balls 2 inches apart on prepared baking sheets. Flatten each cookie slightly with fork.
Bake cookies until lightly browned around the edges, 10 to 12 minutes.
Transfer to flattened brown paper bags or wire racks to cool.

Tip: Dough also freezes well. Freeze dough balls on a cookie sheet and then put them in a ziploc bag in the freezer until ready to bake!


Tuesday, April 29, 2025

CHOCOLATE RUGELACH: National Rugelach Day!


Today is National Rugelach Day. I adore Rugelach, and I must admit, I usually buy them at the bakery, but sometimes I just want to make my own. Rugelach are made with a cream-cheese dough that is wrapped around a filling. Sometimes the filling is nuts or jam, but of course for me it's always chocolate!

This recipe for Chocolate Rugelach is adapted from Giora Shimoni on Kosherfood.com. She calls them Israeli Chocolate Rugelach, because she says Americans tend to fill their chocolate rugelach with mini-chocolate chips, while Israelis make their own filling. Since I always have chocolate around, I make my own filling. This is a go-to recipe. It's easy -- 25 minutes to make and 25 minutes to bake! Be sure to scroll down for Giora's tips on rugelach making. You'll love these pastries for breakfast or brunch or with your morning coffee.Yum!

CHOCOLATE RUGELACH 

DOUGH:
7 ounces unsalted butter
8 ounces cream cheese
1/4 cup sugar
1 teaspoon pure vanilla extract
2 cups all-purpose flour

CHOCOLATE FILLING:
1 tablespoon DARK cocoa
1 tablespoon cinnamon
1/2 cup sugar
1/2 cup grated bittersweet chocolate  (65-70% cacoa)
butter, melted

TOPPING:
1 egg
1/8 cup sugar  (if you don't add cinnamon, use 1/4 cup sugar)
1/8 cup cinnamon (optional)


PREPARATION
In mixing bowl, cream butter and cream cheese together. Add sugar and vanilla, and mix until smooth. Add flour and mix lightly. Refrigerate dough for an hour or more.
Preheat oven to 350 degrees
Divide  dough into four balls. On floured surface, using floured rolling pin, roll one ball out into circle until about 1/8 inch thick.
In small bowl, mix first four filling ingredients together (cocoa, cinnamon, sugar, grated chocolate). Spread some melted butter on the center of the circle. Sprinkle the chocolate mixture on top.
Cut pastry into pie-shaped wedges. For bite-size and nice looking rugelach, thick end of wedge should be about 1 to 1 1/2 inch wide.
Start at wide edge of wedge and roll dough up toward point.
Line cookie sheet with parchment paper. Place each pastry, seam side down, on  paper.
Brush each pastry with the egg and sugar/cinnamon.
Bake for 20-25 minutes or until golden.
  
And here are some great tips from Giora for making perfect rugelach

TIPS:
1. Using too much filling leads to messy looking rugelach.
2. A pizza cutter makes it easier to cut the dough into pie-shaped wedges.
3. If you don't want to use parchment paper, you can spray the cookie sheets with non-stick spray.
4. After rolling dough up and placing on parchment paper, you can stick them in your freezer. When you need fresh rugelach, take them right from the freezer into the oven and add a few minutes to the baking time.

Monday, April 28, 2025

BLUEBERRY CHOCOLATE PIE: Blueberry Pie Day!

I absolutely adore blueberries. When I was young, my Aunt Annie used to take us blueberry picking in the woods. It was such a treat. We'd return to the farm covered in blueberry juice, our mouths and teeth stained with the dark blue liquid. I remember those blueberries as the sweetest I've ever tasted.

Since today is Blueberry Pie Day, I thought I'd post a recipe for Blueberry Chocolate Pie. I've posted other Blueberry Chocolate Pie recipes, but this recipe from Better Homes & Gardens is special because it also features a Cookie Dough Crust. Of course, you can substitute a chocolate cookie crust if you'd like more chocolate. This is a great recipe for Memorial Day and Fourth of July, so be sure to bookmark it!

BLUEBERRY CHOCOLATE PIE

Ingredients
1 Recipe Sour Cream Cookie Dough
1 cup semisweet chocolate pieces
1 egg
1/2 cup granulated sugar
3 Tbsp all-purpose Flour
1 lemon, juiced
6 cups fresh blueberries

Directions 
Preheat oven to 450°F. Prepare Sour Cream Cookie Dough. Roll half of dough to a 12-inch circle on a well-floured surface. Line 9-inch pie plate with dough. Trim and flute edge. Line with double thickness of foil. Bake for 8 minutes; carefully remove foil. Bake 3 to 4 minutes more or until golden. Remove; Sprinkle with chocolate pieces and set aside.

Reduce oven to 375°F. Roll remaining dough to 1/8-inch thickness. Cut into star shapes using assorted-size cutters. In small bowl whisk together egg and 1 tablespoon water. Arrange cutouts 2 inches apart on parchment paper-lined cookie sheets. Brush cutouts with egg mixture. Bake for 7 to 9 minutes or until edges are lightly browned. Remove and cool on a wire rack.

For filling, in large saucepan stir together the sugar, flour, and lemon juice. Add 4 cups of the blueberries. Cook and stir over medium heat until just thickened and bubbly. Remove from heat. Stir in remaining berries. Pour into crust. Bake for 10 minutes just until berries are heated through, covering edge of pie with foil, if necessary to prevent overbrowning. Remove to a wire rack. Top with cookie cut outs. Cool completely.

Sour Cream Cookie Dough: 
In large mixing bowl beat 1/2 cup butter, softened, with mixer on medium to high for 30 seconds. Add 1/2 cup sugar, 1/2 teaspoon baking powder, 1/8 teaspoon baking soda, and a dash of salt; beat until combined. Add 1 egg yolk, 1/4 cup sour cream, and 1 teaspoon vanilla; beat until combined. Beat in 2 cups all-purpose flour. Divide dough in half; wrap and chill, if necessary, until easy to handle.

Sunday, April 27, 2025

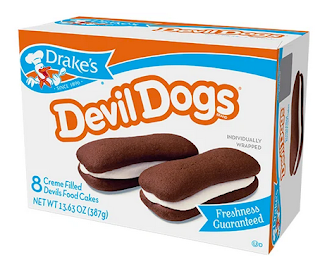
DEVIL DOGS: History & Recipe for National Devil Dog Day!

Today is National Devil Dog Day! This food holiday has nothing to do with devils or dogs. A Devil Dog is similar to a hot-dog shaped whoopie pie. It has a smooth fluffy filling between two devil's food cake fingers. The Devil Dog is produced by Drake's Bakeries, originally known as Drake's Cakes, and they've been making them from 1926. National Devil Dog Day was started by Sean Alexander Sobel, who as a child ate Devil Dogs with his grandfather, Howard Leslie Sobel, and wanted to share the history of the snack. In 2017, the same year Sobel created the day, Drake's introduced Fudge Dipped Devil Dogs. The holiday began being celebrated the following year.
 
The term "Devil Dogs" dates to 1917 or 1918—it is believed the name was coined by Germans to describe American soldiers during World War I and alluded to their tenacity. The term was picked up on the homefront: the German word for it, Teufel Hunden was used on Marines recruiting posters in 1918, and newspaper stories also mentioned the phrase that year. The name became firmly associated with the Marines at that time but began being used for the snack eight years later.

Want to make your own Devil Dogs? Here's a recipe for Home-Made Devil Dogs.  Use a Devil Food Cake mix, but be sure and follow the filling recipe.

HOME-MADE DEVIL DOGS

Ingredients

Cake
1 egg
1/2 cup unsalted butter, softened
1 1/4 cup sugar
1 cup milk
1 tsp vanilla extract
2 -1/3 cups all-purpose flour
1/2 cup Dutch process cocoa
1/2 tsp salt
1/2 tsp baking powder

Filling
6 Tbsp unsalted butter, softened
1 cup confectioners' sugar
1 7-ounce jar marshmallow creme (1-1/2 cups)
1 tsp pure vanilla extract

Directions

Cake
Preheat oven to 400
In medium bowl, blend together egg, shortening, sugar with electric mixer. Continue to beat while adding milk and vanilla.
In anotehr  bowl sift together remaining cake ingredients -- flour, cocoa, salt, and baking powder.
Spoon Tbsp of batter into strips about 4 inches long and 1 inch wide on lightly greased cookie sheet. Bake 5-6 minutes until done. Cool.

Filling:
Put butter in bowl of stand mixer fitted with the whisk attachment and cream until fluffy (about 4 minutes). Add confectioners sugar, marshmallow cream, and vanilla and continue mixing on low speed until combined, fluffy and smooth (about 2 minutes). But cream in pastry bag with large tip (or ziploc bag with corner cut in wide way). Pipe onto cakes as below.

Pipe marshmallow cream over surface to cover, chill 10 minutes so cream stiffens, then place second cake on top to make sandwich. Repeat with remaining cakes and filling. Cover and chill for at least 1 hour before serving. Will keep in refrigerator (covered) for up to 5 days. Can freeze for 2 months.

Makes a lot of Devil Dogs!

Want another recipe for Devil Dogs? Serious Eats has a more 'serious' recipe.. I haven't tried this one yet. If you do, let me know what you think. Thanks!

Saturday, April 26, 2025

Retro Baking Tips: Baking a Cake is easy as Pie!

Here's a page from the Carnation Easy-Does-It Cookbook by Mary Blake (1958): Baking a Cake is easy as Pie! Want to use these Cake Baking Tips to bake a fabulous chocolate cake?  Go here for a recipe for First-Prize Buttermilk Fudge Cake. I'll post Frosting Facts in another post. Get out there and Bake a Cake today!


Friday, April 25, 2025

DOUBLE CHOCOLATE ZUCCHINI BREAD with Pistachios: National Zucchini Bread Day!

Oddly, today is National Zucchini Bread Day. That doesn't really make any sense since it's only April 25 and my zucchini hasn't even started to bloom. Maybe this holiday refers to zucchini growing Down Under? Of course you can buy zucchini in the market all year round, but it's a summer crop in the Northern Hemisphere. By mid-summer if you're growing zucchini here (even one plant!), you've probably run out of friends to hand zukes off to, and you're thinking of wrapping your zucchini up in a blanket, putting them in a basket and leaving them on the church steps, so you might want to save this recipe for the summer.

Unfortunately Zucchini Bread doesn't use up a lot of zucchini, but it's a tasty way of serving up your courgettes! Add chocolate and you're calling my name!

When I first started baking 'vegetable' breads, I used old coffee tins for baking pans, but that was a long time ago, and my beans now come in recyclable paper bags. I usually make my zucchini breads in Bundt pans. Of course conventional loaf pans work, too, since this is a quick bread.

Most recipes say to let the zucchini bread cool before serving. I don't follow that advice since by the time the aroma has filled my kitchen for an hour, I'm ready to devour this Chocolate Zucchini Bread and often do! Since you, too, may make short shrift of this Double Chocolate Zucchini Bread with Pistachios, you'll want to make two, so double the recipe, if you plan to share.

A few comments on zucchini. Depending on where you live, zucchini may be called courgettes or marrows (remember Hercule Poirot throwing the marrow over the fence in the opening of Agatha Christie's The Murder of Roger Ackroyd) and sometimes summer squash (although in my neck of the woods summer squash is a totally different squash and a different color).

For your recipe pleasure, here's a link to recipes for different, but equally tasty Chocolate Zucchini Bread: Geeky Double Chocolate Zucchini Bread and Chocolate Chunk Zucchini Bread. As you know, you can never have too many recipes for Chocolate Zucchini Bread!

This Double Chocolate Zucchini Bread tastes great toasted with a little cream cheese or mascarpone! And, the secret ingredient --  Pistachios!

DOUBLE CHOCOLATE ZUCCHINI BREAD with Pistachios!

Ingredients
3 large eggs
1 3/4 cups sugar
1 cup vegetable oil
1 tsp pure Vanilla
2 Tbsp unsalted butter
6 Tbsp DARK Cocoa
2 cups zucchini, grated
2 cups flour
1 tsp baking soda
dash of salt
1-1/2 tsp. cinnamon
2/3 cup chopped chocolate or dark chocolate chips
3/4 cup coarsely chopped pistachios
2 tsp flour

Directions
Preheat oven to 350°.
In large bowl, combine eggs, sugar, oil, and vanilla. Mix until well blended.
In small saucepan, melt 2 Tbsp butter, add 6 Tbsp cocoa and blend until smooth. Set aside to cool.
Peel and grate zucchini. Add zucchini and cooled cocoa mixture to the large mixing bowl and blend well.
In separate bowl, mix together flour, baking soda, salt, and cinnamon. Add dry ingredients to batter. Stir only enough to blend in all dry ingredients.
In another bowl, coat broken up chocolate chunks (or chips) with 2 tsp flour.
Fold in flour-coated chocolate chunks and chopped pistachios to batter.
Spoon batter into two greased and floured 9x5x3 loaf pans or into greased bundt pan.
Bake 60-70 minutes or until a toothpick inserted in middle comes out clean.
Cool in pans for 5-10 minutes.
Remove from pans and continue to cool on wire rack.

Cartoon of the Day: Recipes for Happiness

From one of my favorite cartoonists Hilary Price at Rhymes with Orange. Definitely a Recipe for Happiness!


Thursday, April 24, 2025

CHOCOLATE MARLOW: Retro Ad with Recipe

Recently I've been thinking about 'new' sources for 'old' recipes. This Retro Advertisement is from Woman's Day Magazine, September 1949 (a great site for retro recipes).

I've never seen White House Evaporated Milk, but any evaporated milk will do. I do remember the A&P. My mother shopped there. Well, there and at the Acme. Remembering shopping trips as a child, I must mention that my mother did most of her shopping at Reliables. It was a small Mom & Pop corner grocery store where she would choose her fruits and vegetables, and, occasionally some staples -- and the staff delivered everything later the same day. She would then go to the butcher for meat, the chicken store for chicken, the fish store for fish, and the bakery for bread--fresh every day! And all delivered. We're talking the 1950s. But really it's kind of the way I shop, today, although not always delivered -- well not if you want to choose your own groceries, that is! I think of it as so European, but it's really just full circle back to my mother's generation.

Eggs were delivered twice weekly by the eggman who got eggs from a farm in New Jersey. As far as milk, well, of course, it was left at the backdoor every morning. Maybe I don't really remember this, maybe I just heard about it from my grandmother who lived with us, but I have images of the milkman coming up the wide back alley in his horse drawn truck. Probably not, but such a great visual emblazoned on my brain!

Anyway, here's a recipe that can be easily updated for a quick dessert. Use really good chocolate, pure vanilla, homemade marshmallow or marshmallow creme, whipping cream instead of evaporated milk, and it will be fab. Rotary egg beater? I no longer have one, but I do have a whisk and a hand beater - - and, of course, a KitchenAid mixer. Recipe says to freeze with temperature control set at coldest setting! That's pretty funny, too! Anyway, as far as recreating this recipe, in a pinch, use what you have or follow the directions! Easy and quick. A little research on my part turned up several Marlow recipes including strawberries. Must have been a popular dessert in the 1940s & 1950s. Unfortunately, this will cost more than 8 cents a serving.

CHOCOLATE MARLOW

Wednesday, April 23, 2025

CHOCOLATE CHERRY CHEESECAKE: Cherry Cheesecake Day!

In celebration of National Cherry Cheesecake Day, I am reposting an easy delicious recipe for Chocolate Cherry Cheesecake adapted from Pillsbury.

I always make my own tried and true Chocolate Cookie Crust! About the crust: Sometimes I bake it first, and sometimes I don't. It won't matter in this recipe, but I like it to be a bit more crunchy for texture, so I usually bake it before adding filling.

CHOCOLATE CHERRY CHEESECAKE

Chocolate Cookie Crust
About 40 chocolate wafers (2 cups crumbs)
6 Tbsp unsalted butter, melted and slightly cooled
Pinch of salt

Directions
Process cookies in food processor until finely ground.
Transfer crumbs to mixing bowl & combine crumbs, butter, salt. Stir until crumbs are moistened.
Press mixture evenly across bottom of 10-inch springform pan and all the way up sides of pan. Pack tightly so crust is even.
Bake in 350° oven for 6-8 minutes or until crisp.
Let cool completely before filling. You can put it in the refrigerator while you make the filling.

Filling 
4 packages (8 oz each) cream cheese, softened
3 eggs
3/4 cup sugar
1/2 tsp pure vanilla extract
1/2 cup whipping cream
20 ounces cherry pie filling  (I use Chukars Sour Cherry Pie Filling but use what you like)

(Optional) Glaze 
1/2 cup whipping cream
1 cup (or about 6 ounces) dark chocolate, chopped

Directions
Make crust as above.
In large bowl, beat cream cheese with electric mixer on medium until smooth. Add 1 egg at a time, beating well after each addition. Beat in sugar and vanilla extract until smooth. Add 1/2 cup whipping cream; blend well.
Spoon 3 -1/2 cups cream cheese mixture into crust-lined pan, spreading evenly. Carefully spoon 1 cup pie filling evenly over cream cheese layer (reserve remaining pie filling for topping). Spoon remaining cream cheese mixture evenly over pie filling.
Bake 1 hour 5 minutes to 1 hour 15 minutes or until center is set. Cool in pan on wire rack 1 hour.
Serve topped with remaining cherry pie filling.

Optional: I don't think you need to add this, but if you want more chocolate!
In 1-quart saucepan, heat 1/2 cup whipping cream to boiling over medium-high heat. Remove from heat. Stir in chopped chocolate until melted.
Line cookie sheet with waxed paper. Remove side of pan. Place cheesecake on paper-lined cookie sheet. Before adding the extra cherry pie filling -- Spread chocolate glaze over cooled cheesecake, allowing some to flow down side. Refrigerate at least 3 hours or overnight.


Tuesday, April 22, 2025

Cracked Earth Flourless Chocolate Cake: EARTH DAY

Earth Day 2025! Be sure and take a walk today and appreciate our planet earth. As many of you know, I blog about mystery/crime fiction at Mystery Fanfare. I'm the Editor of the Mystery Readers Journal. We had an issue a few years ago (Volume 36:1) that focused on Environmental Crime Fiction/Mysteries. Today on Mystery Fanfare, I blog about Reservoir Noir: books that deal with intentional flooding of towns and villages because of building dams and reservoirs for water supply, irrigation, power and other reasons--a sad addition to the environmental crime fiction list.

I don’t know of a good crime novel that involves the chocolate trade. That’s a theme ripe for a good mystery. Something to think about today when you make “Cracked Earth Flourless Chocolate Cake” from the recipe below.

The recipe for the cake is adapted from Tyler Florence of the Food Network. It's his Cracked Earth Flourless Chocolate Cake. And, it's Gluten-Free.

Cracked Earth Flourless Chocolate Cake: Earth Day

Ingredients
1 pound organic fair-trade dark chocolate (65-85% cacao), chopped into small pieces
1 stick unsalted butter
9 large eggs, separated
3/4 cup granulated sugar, plus 1 Tablespoon
2 cups heavy cream, cold 

Directions
Preheat oven to 350 degrees F.
Butter 9-inch springform pan.
Put chocolate and butter in top of double boiler over simmering water until melted.
Meanwhile, whisk egg yolks with sugar in mixing bowl until light yellow in color.
Whisk a little of chocolate mixture into egg yolk mixture to temper the eggs - this will keep eggs from scrambling from heat of the chocolate; then whisk in rest of chocolate mixture.
Beat egg whites in mixing bowl until stiff peaks form and fold into chocolate mixture.
Pour into prepared pan (spray bottom with nonstick spray) and bake until cake is set, top starts to crack, and toothpick inserted into cake comes out with moist crumbs clinging to it, 20 to 25 minutes (and then check every five minutes after that--don't overbake).
Let stand 10 minutes, then unmold.

Monday, April 21, 2025

WHAT TO DO WITH LEFTOVER EASTER CHOCOLATE!


Today both high end and low end Easter Chocolate is on sale at 50% off. This is the perfect time to scoop up the bargains. But maybe you still have some leftover chocolate at home? Perhaps not the ears of the bunny, but body parts and decimated eggs? Put all that chocolate to tasty use!

If it's still in its wrapping, donate leftover chocolate to homeless shelters -- or if it won't melt, ship overseas to military personnel.

But if your chocolate is in pieces and chunks, here are a few ideas. Leftover chocolate goes great on ice cream or added to brownies and cookies. So many creative ways to re-purpose and re-savor Easter Candy.

Freeze for Later: Chop up chocolate bunnies and chocolate eggs. Freeze the pieces and use instead of chocolate chips in cookies and other goodies. 

Ice Cream: Melt Easter bunny parts and pour over ice cream. Add some nuts. Or just chop it up and sprinkle on ice cream. Add berries and whipped cream for a great sundae.

Milk Shake: Use any chopped chocolate with two scoops of ice cream and some milk. Blend!

S'Mores: Well they're a natural with Peeps, especially the chocolate covered ones.. but in a pinch add some chocolate bunny, a peep, a graham cracker, and put in the oven or microwave. Add another graham cracker and you're good to go!

Trail Mix: Well, duh... chop up the chocolate and add some dried fruit and nuts. I think a chopped up chocolate coconut egg would be a great addition, too! Put it in a small baggie and go for a hike!

Chocolate Covered Strawberries: Instead of dipping (unless you have a lot of chocolate), drizzle melted chocolate over fresh strawberries.

Candy from Candy: Melt Chocolate Bunnies or Easter eggs in double boiler or microwave. Once  chocolate is hot and smooth, pour into candy molds.

Chocolate Fondue: see my fondue recipes. The Bunny has never tasted so good... Retro treat with Retro Chocolate. Dip leftover PEEPS and fruit.

Hot Chocolate: Melt some chocolate. Add water or milk and heat until perfect. Add some whipped cream (or a PEEP)!

Brownies: I always add some extra chopped chocolate to my brownies, so why not some Chocolate Easter Eggs? Chop and fold into batter. 

Pancakes: Make a batch of pancakes and drop some chocolate in (do it toward the end or the chocolate will scorch) or melt some chocolate and use in place of syrup.

Muffins and Waffles: Chop up Chocolate and add to muffins or waffles.

Trifle: Layer chopped Bunnies with leftover cake or brownies, whipped cream, cookie crumbs and anything else that seems yummy to you. I like to make trifles in clear glass containers to see all the layers of delicious chocolate goodness!

Cookies: Do I really need to tell you how to do this? Chop and Drop in your favorite batter!

Cupcakes: Any way you'd use chocolate -- or use an apple corer and fill the centers.

Rice Krispies Treats: Melt chocolate, then stir in Rice Krispies. Spread on a tray. Put in Refrigerator. Cut.

Any other ideas for left-over Easter Chocolate? Leave a comment. 

Sunday, April 20, 2025

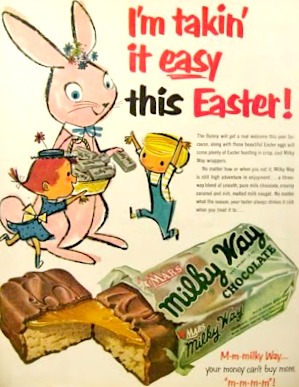
Vintage Easter Chocolate Ads: Happy Easter!

Put on your Easter Bonnet and bite into some Chocolate Eggs, Bunnies, and Candy! Have a wonderful Chocolate Easter! Enjoy these Vintage Chocolate Easter Ads from the 1940s, 50s and 60s.


Saturday, April 19, 2025

CHOCOLATE COVERED STRAWBERRY 'CARROTS' IN CHOCOLATE DIRT: The Perfect Edible Easter Centerpiece

Photo Credit: Driscoll's
Searching for the Perfect Edible Easter Centerpiece? You've found it! These Chocolate Covered Strawberry 'Carrots' in Chocolate Dirt are adorable and easy to make. Thanks once again to Driscoll's Strawberries for the recipe and for their always perfect strawberries! These Chocolate Covered Strawberry Carrots in Chocolate Dirt are also great for a Spring Table!

This has to be the best presentation I've seen in awhile. I actually use these little tin buckets for my succulents, so I have plenty. Don't have tin buckets? You can use small mason jars.

CHOCOLATE COVERED STRAWBERRY 'CARROTS' IN CHOCOLATE DIRT

Pudding 
1 cup sugar
4 Tbsp unsweetened cocoa powder
1/2 tsp salt
2 tsp pure vanilla extract
8 ounces bittersweet chocolate
4 cups whole milk, divided
6 Tbsp cornstarch

Dirt Topping
2 cups chocolate wafer cookie crumbs (about 40 cookies) You can also use Oreos.

Strawberry Carrots 
1 package (16 ounces) Driscoll's Strawberries (the 8 largest from the package for dipping)
11 ounces white chocolate (make sure it's 'real' white chocolate--made with cocoa butter)
Gel food coloring (red and yellow)

Directions

Pudding 
In double boiler melt bittersweet chocolate. Set aside.
Whisk together 1 cup milk and cornstarch.
Bring remaining 3 cups milk, sugar, cocoa, and salt just to simmer over medium heat. Stir cornstarch mixture then add to milk mixture in saucepan and bring to a boil, whisking constantly. Cook 1 minute. Remove from heat and stir in melted chocolate and vanilla. Divide pudding between 8 food safe 6 oz stainless steel mini pail buckets or small 6 - 8 oz jars or glasses. Cover surface directly with plastic wrap to prevent skin from forming. Chill.

Preparing strawberries
Rinse and dry strawberries. You do not want water on the berries when you dip them in chocolate. For best results berries should be at room temperature for dipping to ensure that the chocolate will adhere to berry.

Melting the Chocolate 
To melt chocolate on stovetop, put white chocolate in double boiler (or saucepan over saucepan) over simmering water.

Dipping and Decorating
Line baking sheet with wax paper or parchment paper. Once chocolate has melted, add 4 drops of yellow gel food color and 4 drops of red food gel color and stir well until thoroughly blended into chocolate.
Holding strawberry by green leaves, dip it into chocolate swirling the strawberry until coated. Coat about 3/4 of the way up the strawberry leaving some strawberry showing. Shake off excess chocolate and place on prepared baking sheet to set.

After dipping strawberries, take remaining chocolate and gently reheat until fully melted again. Prepare pastry bag fitted with piping tip and fill bag with remaining chocolate. With berries lying on baking sheet, start at tip of each berry and pipe lines half way across strawberry, alternating starting from left, then right until up to chocolate line below the calyx (strawberry stem). Repeat with remaining berries. If you don't have a pastry bag, you can dip  fork into the melted chocolate and drizzle the lines on--or you can use a ziploc with corner cut out.
Place decorated strawberries in refrigerator until chocolate is firm.
Before serving, remove plastic wrap from pudding and sprinkle tops of each pudding with cookie crumbs.
Once finished, add chocolate covered strawberry to center. Serve immediately.