Pages

Saturday, November 4, 2023

HOMEMADE OH HENRY! BARS: 3 Recipes for National Candy Day

Today is National Candy Day. Of course for me that means chocolate. Of the 'oldtime' candies, I really like Oh Henry! Bars. Of course you can buy one to celebrate the day, but why not make your own?

So what exactly is an Oh Henry! Bar?  

From Wikipedia:

Oh Henry! is a chocolate bar containing peanuts, caramel, and fudge coated in chocolate. It was first introduced in 1920, by the Williamson Candy Company of Chicago, Illinois. According to legend, Oh Henry! was originally named after a boy who frequented the Williamson company, flirting with the girls who made the candy. The name is also said to be a homage to American writer, O. Henry. However, there is no definitive explanation as to the exact origin of the name.

Another theory is that the candy bar was invented by a man named Tom Henry of Arkansas City, Kansas. Tom Henry ran a candy company called the Peerless candy factory, and in 1919 he started making the Tom Henry candy bar. He sold the candy bar to Williamson Candy Company in 1920 where they later changed the name to "Oh Henry!". Henry's family now runs a candy factory in Dexter, Kansas that sells "momma henry" bars, which are nearly identical to the original candy bar.

In 1923, an employee of Williamson, John Glossinger, announced that he was going to make the Oh Henry! bar a national best seller. Company officials said it was impossible and denied him the funds for an advertising campaign. Glossinger went into the streets and pasted stickers saying merely "Oh Henry!" on automobile bumpers. People became curious as to what an Oh Henry! was and sales for the bar rose quickly.

1926 Oh Henry! Advertisement
Nestlé acquired the United States rights to the brand in 1984, and continues to produce the bar. In Canada, the bar is currently sold by The Hershey Company and manufactured at their Smiths Falls, Ontario facilities. Because of Canada's different chocolate standards, the Canadian "Oh Henry!" is not considered a "chocolate bar" and is labelled instead as a "candy bar." In fact, unlike the American version, which labels the bar as "milk chocolate," the Canadian version makes no mention of chocolate on the front of the wrapper. Hershey sells Oh Henry! bars made in Canada on a very limited basis in the United States as Rally bars, using the trademark of a Hershey product introduced in the 1970s and later discontinued.

Want to make your own Oh Henry! Bars? Here are three different recipes. Funny, but several of them include oats. I'm partial to #3 because it doesn't include oatmeal, but that's just me. The first two recipes really capture the flavor. Why not try all three?

1. Oh Henry! Candy Bars

Ingredients
4 cups oatmeal
1 cup brown sugar
1/2 cup white sugar
1 cup butter (melted)
1 cup chocolate chips
3/4 cup peanut butter

Directions
Mix together oatmeal, brown sugar, white sugar, and melted butter.
Press into greased 9 x 13 pan.
Bake at 350 degrees for 15-20 minutes. Melt chocolate chips and peanut butter.
Spread over baked bars.
Put in fridge so frosting hardens completely.

2. Oh Henry! Candy Bars 

Ingredients
1 cup brown sugar
1 cup butter
1/2 cup white Karo syrup
2 cups oatmeal

Directions
Melt butter, sugar ,and syrup.
Add oatmeal.
Press in well buttered 9 x 13 inch pan. Bake 12 minutes at 350 degrees.

Melt:
1 c. crunchy peanut butter
1 (6 oz.) chocolate chips

Cool bottom layer and spread mixture over the top.
Refrigerate.
Cut in squares.

3. Oh Henry! Candy Bars (my favorite recipe)

Part One
2 cups granulated sugar
1 cup light corn syrup
1 cup water
3/4 cup peanut butter

Directions:
Combine over heat, stirring until sugar is dissolved.
Cook until it reaches the hard boil stage (265 degrees).
Let cool
Add peanut butter.
Stir, then shape into rolls 3/4 inch thick and 1 inch long.
Set aside.

Part Two
1 cup light corn syrup
1/2 cup brown sugar
2 pounds peanuts, chopped fine
8 oz. dark chocolate, chopped

Directions:
Cook corn syrup and sugar together until it reaches the hard boil stage (265 degrees).
Dip candy from first mixture into second mixture, then roll in peanuts while still hot.
Melt dark chocolate and dip rolls into melted chocolate
Place on parchment paper.

Friday, November 3, 2023

CHOCOLATE MAYO BLT: National Sandwich Day

Today is National Sandwich Day, as opposed to National Sandwich Month which takes place throughout the Month of August. A sandwich is defined as a food item made of two or more slices of leavened bread with one or more layers of filling, typically meat or cheese, with the addition sometimes of vegetables or salad. Sometimes mustard, mayonnaise, or butter is used.

I've posted may recipes for Chocolate Panini and Chocolate Grilled Cheese Sandwiches and the like, but I love this recipe that appeared in 2009 in the Recchiuti Chocolate newsletter. Michael has a dynamite Recipe for Brioche and Chocolate Mayo BLT. I love bacon and chocolate, and this is a subtle pairing. There's a Recipe for brioche that looks fairly easy, but if you can't wait, go out and buy a nice artisan brioche to use in this special BLT.

At the Cheese & Chocolate Taste Project, Recchiuti assembled his BLTs with his homemade brioche, applewood smoked bacon, sharp cheddar cheese, fresh butter lettuce, a thick slice of heirloom tomato and this great Chocolat-y mayonnaise.

CHOCOLATE MAYONNAISE

Ingredients
6 extra-large egg yolks
1/4 pound unsweetened chocolate, coarsely chopped (I love Recchiuti chocolate!)
3 tablespoons olive oil
pinch of salt and pepper

Directions
Place yolks in a stainless steel mixing bowl.
Combine unsweetened chocolate and olive oil in double boiler and heat mixture to 115°F.
Begin beating egg yolks on medium speed for 1 minute, then increase speed to high and whip until doubled in volume.

Reduce speed to medium and add chocolate mixture to the yolks carefully, in fine stream. The yolks will start to emulsify and thicken. If mixture becomes too thick you may add a small amount of oil to loosen the mixture. Season to taste.

Note: This mayonnaise is meant for immediate use and will not keep well in the refrigerator.

Celebrate the day with this fabulous BLT!

Thursday, November 2, 2023

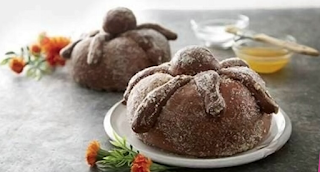
PAN DE MUERTO DE CHOCOLATE: Day of the Dead!

Here's a great Day of the Dead recipe. This recipe for Pan de Muerto de Chocolate comes from the Hershey's Kitchens. It's a great twist on the traditional Day of the Dead sweet yeast bread, as it adds Cocoa for a rich flavor and a bright orange glaze for an extra shiny boost and flavor. This recipe makes two loaves!

PAN DE MUERTO DE CHOCOLATE

Ingredients 

1/2 cup unsalted butter
1/2 cup milk 
1/2 cup water 
1 tsp anise extract 
5 cups all-purpose flour plus flour for dusting work surface, divided 
3/4 cup granulated sugar 
2 packages active dry yeast 
1 tsp salt 
4 eggs 
1/2 cup HERSHEY'S Cocoa (or a cocoa of your choice)

Directions

Line two cookie sheets or baking pans with parchment paper; set aside. 

Combine butter, milk and water in small saucepan. Heat on medium heat, stirring occasionally, until mixture is very warm (do NOT boil) and butter is melted. Remove from heat; stir in anise extract. 

Stir together 1/2 cup flour, 3/4 cup granulated sugar, yeast and salt. Gradually add butter mixture, beating until well blended. Add eggs, one at a time, mixing thoroughly. Stir together remaining 4-1/2 cups flour and cocoa; gradually add to butter mixture, mixing well until soft dough begins to form.

Place dough on lightly floured surface. Knead 10 minutes (dough will be smooth and elastic). Form dough into large ball. Place dough into a lightly greased bowl; flip the dough so that all sides are greased. Cover loosely with plastic wrap and let rise in a warm place until doubled in size (about 2 hours). 

Heat oven to 350 F. Heat oven to 350°F. Punch dough down. Cut away about 1/4 of the dough; set aside. Divide remaining dough in half; shape into two round loaves. Place one loaf on each prepared baking sheet. Divide reserved dough into 14 equal balls. Roll 12 balls into stips ("bones") and place 6 across top of each loaf. Place remaining balls in center top of each loaf. Cover loosely with plastic wrap; let rise in warm place until doubled. 

Bake 30 to 35 minutes or until bread sounds hollow when tapped. Cool slightly. Make ORANGE GLAZE; brush over tops. Cool completely. Just before serving, dust tops with powdered sugar, if desired. 

ORANGE GLAZE 

Ingredients

1/2 cup granulated sugar 
2 tablespoons freshly grated orange peel 
1/3 cup fresh squeezed orange juice 

Directions

Combine sugar, orange peel and orange juice in small saucepan. Heat over medium heat, stirring constantly, until mixture just comes to a boil and sugar is dissolved. Remove from heat.

Wednesday, November 1, 2023

DAY OF THE DEAD: Day of the Dead History, Pasilla Chile Chocolate Cake, and Mexican Hot Chocolate

Day of the Dead is the perfect time to create some sensation sweet treats. 

Day of the Dead focuses on gatherings of family and friends who pray for and remember friends and family members who have died. The celebration takes place on November 1st and 2nd in connection with the Catholic holiday of All Saints Day which occurs on November 1st and All Souls Day which occurs on November 2nd. Traditions include building private altars honoring the deceased, making sugar and chocolate skulls, marigolds, and the favorite foods and beverages of the departed, and visiting graves with these as gifts.

Many cultures and countries celebrate Day of the Dead, but in Mexico and parts of the U.S and Canada it's tied to an historic Meso-American holiday that originated with the Aztecs 3000 years ago or earlier. When the Spanish Conquistadors landed in what is now Mexico 500 years ago, they found the natives practicing this ritual that seemed to mock death. It was a ritual the Spaniards tried unsuccessfully to eradicate. Although the ceremony has since merged with Catholic theology, it still maintains the basic principles the Aztecs intended, a view that death is the continuation of life. Life was a dream and only in death does one become truly awake.

Many people believe that during the Day of the Dead, it's easier for the souls of the departed to visit the living. People go to cemeteries to communicate with the souls of the departed, and build private altars, containing the favorite foods and beverages, as well as photos and memorabilia, of the departed. The intent is to encourage visits by the souls, so that the souls will hear the prayers and the comments of the living directed to them. Celebrations can take a humorous tone, as celebrants remember funny events and anecdotes about the departed.

Skulls are a major symbol of the cycle of death and rebirth. The Aztecs and other Meso-American civilizations kept skulls as trophies and displayed them during the ritual to honor the dead and exalt the sphere of death and rebirth.

Although sugar skulls are more common, chocolate skulls and coffins have become de rigueur. Celebrate Dia de los Muertos with three solid chocolate skulls sparkling with black salt eyes, in 3 chocolate flavors: Barcelona, Red Fire & Blanca. Day of the Dead Chocolate Skulls from Vosges.

Want to make your own? Mexican Chocolate Skulls sells skull molds. Their chocolate molds can be made with tempered chocolate, candy coating wafers, or melted chocolate chips. Their mold designs were inspired by the Mexican woodcut artist, Jose Guadalupe Posada (1852 -1913). Here's a link to recipes using candy coating wafers, chocolate chips, or tempered chocolate with these molds.

Last year I posted a recipe for Haunted Chocolate Skull Cakes. Love the Wilton Skull Cakelette pan.

Mexican hot chocolate is one of my favorite ways to celebrate. In Oaxaca during the Day of the Dead (and other times), the many chocolate shops serve hot chocolate that is a mix of cocoa beans, cinnamon sticks, almond and sugar ground together into a paste, then grated down and mixed with steaming milk. You can make a similar version easily at home. As always use the very best chocolate.

Day of the Dead Mexican Hot Chocolate

Ingredients
2 tsp good-quality ground cocoa
1 tsp sugar, plus extra to taste
1/4 tsp ground cinnamon
1/2 tsp ground almonds. You can add more if you want a thicker texture
1 cup whole milk

Directions
Mix all ingredients, except milk, together in an empty, clean glass jar. Shake until completely combined.
Heat milk in pan and add chocolate mix. Bring to boil and reduce heat.
Simmer for about 2 minutes, stirring constantly; use small whisk to froth milk. Serve hot.

And, for the Bakers out there, Sunset Magazine has this wonderful Pasilla Chile Chocolate Cake recipe for The Day of the Dead.

Day of the Dead Pasilla Chile Chocolate Cake

Ingredients
2 1/2 ounces dried pasilla chiles (chile negro) or 2 1/2 ounces dried ancho chiles plus 1/4 teaspoon cayenne (see notes)
1 pound bittersweet or semisweet chocolate, chopped
3/4 cup unsalted butter, room temperature, cut into 1/2-inch chunks
5 large eggs, separated
2 tsp vanilla
1-1/2 Tbsp all-purpose flour
1/2 cup firmly packed dark brown sugar or finely crushed piloncillo sugar (see notes)
1/4 tsp cream of tartar
Powdered sugar
1 cup whipping cream
1 tsp Mexican vanilla or 1 Tbsp coffee-flavored liqueur such as Kahlúa

Directions
Lay chiles in single layer on 12- by 15-inch baking sheet. Bake in 400° oven just until pliable, about 2 minutes. Wearing rubber gloves, break off stems, shake out seeds, and break chiles into small pieces, dropping into small bowl; discard stems and seeds. Cover chiles with warm water and let soak until soft, 5 to 7 minutes. Drain chiles and put inblender with 1/3 cup water; whirl until smooth, adding 1 more tablespoon water as needed to make thick paste. Push purée through a fine strainer; discard residue. You need 1/3 cup chile purée. If using ancho chiles, stir cayenne into the chile purée.

Line bottom of 9-inch cake pan (sides at least 1-1/2 inches tall) with parchment.

In large bowl over saucepan of simmering water (water shouldn't touch bottom of bowl), combine chocolate and butter. Stir occasionally just until chocolate is melted and mixture is smooth, about 8 minutes. Remove from over water and whisk in 1/3 cup chile purée, the egg yolks, vanilla, and flour until mixture is blended.

Pour brown sugar into small bowl and stir or whisk to break up lumps and loosen. In large bowl, with electric mixer on high speed, beat egg whites and cream of tartar until very frothy and foamy. Gradually add brown sugar to whites, beating until stiff, moist peaks form. With whisk, fold third of beaten whites into chocolate mixture until well incorporated. Then fold in remaining whites just until blended. Scrape batter into prepared pan.

Bake cake in 425° regular or 400° convection oven until set and center barely jiggles when pan is gently shaken, about 15 minutes. Let cool in pan on a rack for about 15 minutes. Run a knife between cake and pan rim, then invert onto  serving platter. Lift off pan and peel off parchment. Let cake cool about 30 minutes, then chill until firm and cold, at least 4 hours; cover cake once completely chilled.

For best texture, let cake come to room temperature before serving, 45 minutes to 1 hour. Sift powdered sugar lightly over cake (for pattern, lay stencil on cake before sifting sugar, then carefully lift off).

In bowl, beat whipping cream until soft peaks form. Stir in vanilla. Cut cake into wedges and serve each with dollop of whipped cream.


NOTES: Dried long, dark, skinny chiles labeled pasilla or chile negro give this dark chocolate cake a subtle fruit flavor with a hot finish. If these are not available, use dark, blocky chiles labeled ancho, which are sweet and fruity with little heat, and add cayenne to boost spiciness. Both pasilla and ancho chiles are available in Hispanic markets. To use piloncillo sugar (also available in Hispanic markets), put it in a heavy zip-lock plastic bag, cover it with a towel, and pound it with a mallet or hammer until finely crushed. You can make this cake up to 2 days ahead; chill airtight.


SaveSave